1

Martial Arts: Boosting Self-Confidence In Your Kids

The roots of martial arts date back to roughly fifteenth century China. In thousands of years, the various forms of martial arts have scored a high popularity all over the world among adolescents, elders, and children.  The art is also a great means of unarmed combating or self-defense, which makes martial arts the best choice for child and women. It makes them capable, confident, introspective and develops leadership qualities.

Making the learner physically, mentally and emotionally strong is the natural extension of martial arts. The art enables the next-generation to reach their goals efficiently with high self-esteem and self-confidence. That’s the reason parents are increasingly favoring martial arts and want their children to advance in their life with proper training.

There are many training centers operating worldwide that offer different forms of martial arts training to the young adults, kids, and elders. Premier Shooting & Training Center in Cincinnati, OH is one of them.

Eliminate Timidness And Shyness

The kids who are introvert, quiet and calm find it extremely difficult to communicate with their peers, teachers or friends. That’s why they are often overlooked in school and social environments, which inhibits their growth and puts them off.

Making such shy children come to the martial arts training center is a hard nut to crack. But somehow, if parents manage to make them head to the center, the martial arts instructors can turn the first visit to the center into the exciting and powerful lesson of empowerment.

The encouragement and appreciation improve the self-confidence in kids.

Deter Bullies

Bullies really hurt and give a feeling of helplessness. Kids who suffer from the emotional abuse of bullying sometimes get emotional scars that take a lifetime to heal. It’s agonizing for the parents.

With martial arts training, the bullying can be stopped not by making the kids powerful enough to fight. Instead, martial arts teaches them how to properly address the physical and verbal confrontation within the limits. It aids the kids in getting control over themselves and bullies, which in turn builds up their confidence.

Explore New Opportunities

Children with a shy nature rarely accept new challenges or try new experiences in life. The low self-esteem doesn’t allow them to learn new things or acquire skills. Martial arts training can turn that attitude around into a winning one.

Martial arts teaches children to think clearly, logically and creatively which allows them to tap into the full potential of an opportunity and potentially reaps its advantages.  This momentum, in turns, builds confidence.

Create Leaders, Not Loners

More often than not, children find it easier to follow than lead. Martial training helps them change this mentality by implementing confidence. When they learn martial arts among several kids, they start interacting with them and showing their skills.  The tests conducted after the practice generates a team spirit and leadership qualities in them.

Remove Peer Pressure

Few children are able to express themselves without the dread of what their peer thinks about them. The trap of peer pressure won’t let them do what they want to do and perform to their ultimate ability.

Martial arts training infuses essential strength in children that teaches them how to avoid dangers or temptations without making compromises with their values and spoil their character. The moral values instituted in martial arts training always keep the children in a high moral position and uplift their self-confidence.

The Perks Of Martial Arts Training

Martial arts is more than simple self-defense. It’s a mindset that helps children accomplish their goals by building self-confidence. The positive experiences and the guidance of the instructors allow the children to reach their goals without getting engulfed in peer pressure, reduce the effect bullies have on them and build strong, self-confident individuals.

Martial arts training addresses all the problems and reinforces self-confidence in children.  It also instills a strong fitness regimen. It’s time to make your child push their limits and strive for the success so that they can easily turn the setbacks and problems of the life around.

Do you want your kids to ascend to the next level with these qualities? If so, let your child become a martial artist with improved physical and psychological strength.

Martial Arts: Boosting Self-Confidence In Your Kids


3 Ways To Bug Out When SHTF

Imagine a situation where the world is going into chaos for whatever reason – natural disaster, financial collapse, whatever.  Bugging in is just not an option because your dwelling is in immediate peril.  It’s time to bug out!  But you have to act fast. What do you do?

Bugging out is going to be the beginning of one of the most difficult things you’re going to do in your entire life. I say “the beginning” because when you’re out there, every hour and every day is a race against time. You either get to safety or you don’t.

In what follows, I’m going to let you in on some of the ways to get out of a crowded city, and I’m also going to offer solutions for those of you living in the ‘burbs.

You should know ALL the ways to get out of your city and should have at least a car at your disposal to do so if you’ve done a proper job of prepping. If you live in the suburbs, you probably have one, maybe two ways to get out assuming you’re not going to evacuate through the other side of the city. But that’s not a bad thing; the advantage is that those one or two roads are less likely to be blocked, giving you the opportunity to make a quick exit.

Bug Out Early

This scenario is the best option. If for whatever reason you find out that things are going south before anyone else, you have enough time to bug out before the rest of the town figures they need to do the same.

How can you find out in advance?

  • Listen to local radio or TV; police band radio is also a great resource
  • Maintain a network of friends and preppers who keep in touch with the latest local happenings
  • Anticipate big events by keeping an eye on national news events that could potentially affect you locally

If any or all of the above happen:

  • Immediately contact your family and friends and meet them at a pre-determined rally point
  • Follow social media as well as local radio and TV networks to confirm that this is really happening
  • Decide whether you need to bug in or out or not
  • Act as soon as humanly possible

Bug Out At Night

Wait until 3 or 4 in the morning to bug out would be wise if you haven’t waited until the masses are on the move. There should be fewer people roaming the streets at those early hours.

Do not push the pedal to the metal and take off despite the open road. Police may still be patrolling and being pulled over for speeding will delay your exit and potentially foil it completely.

Yes, you need to be quick, but you also have to be on alert. Just because a road looks ok, that doesn’t mean it’s safe. Darkness is not just your friend it’s also a friend of your enemies.

Bug Out Undercover

Whether you’ll bug out on foot, using a motorcycle or your car, one thing you need to do is to do it undercover. That means you don’t want to stand out in any way – and they’re a lot of ways you can stand out.

For example, it may be ok to use one of those electric scooters by Segway to evacuate if you have no choice, but do it at 3 AM in the morning might attract attention. Sure, it could work if that’s all you got but keep in mind these can only take you about 15 to 20 miles until you have to recharge them.

One way of staying undercover is to use a more common means of transportation.  It is less obvious what is going on if you’re in a normal vehicle than something that stands out more.  Wouldn’t a quad on the highway stand out to you?

The next thing you should be careful about what you’re wearing. Jewelry, suits and provocative clothes are a no-no. They say wearing a hat can make you look taller in a riot, but if you’re evacuating at night, that won’t matter. It’ll have the added benefit of hiding your face from certain angles. Hats and baseball caps are great in keeping a low profile.

Last but not least, tell as few people that you’re leaving as possible. The fewer neighbors know you left, the better. Otherwise, rumors will spread and someone might eventually burglarize your home.

If you’re evacuating during the day, the same rules apply. Know where you’re heading. Don’t tell anyone and keep going while traveling as calmly as possible.

Conclusion

As you can see, there’s no secret information when it comes to bugging out. You have to be quick. You have to be alert. And, above all else, you must anticipate how and when things will go wrong. There is no bulletproof plant for you to stay safe during a bug out, but bugging out gives you mobility, and it might be the only option for you regardless of whether or not you prepped to bug in.

3 Ways To Bug Out When SHTF


Pallet Projects For Suburban Homesteaders

I recently bought a brand-new house in the suburbs of Boise, Idaho. One of the best things about the suburbs is the ease of access to places with pallets, which you can get for free or for just a few dollars. Here’s a great guide for how to pick a suitable pallet and to tell whether they are heat or chemically treated. Disassembling is quite easy, providing the raw materials for projects.

First, an important note: Be sure to clean and sanitize the wood no matter whether you have reclaimed wood in the form of a pallet, a local seller, or from your own tree.  It could carry germs into your house. Cleaning will also help eliminate potential slivers. Once done and dried, you are ready to start your projects.

Pallet Projects

1. Love Seat

Although the instructions for this love seat call for plywood, pallet boards work just as well. Cut a template for the seat portion.  Make sure it will be a comfortable seat by comparing the curves to a couch. Then, seal and stain the wood.  Finally, glue or nail everything together. This piece goes perfect with a garden – but we’ll get to garden projects later.

2. Patio Couch

Have room on your patio for more than just a love seat? Upgrade to a full L-shaped couch. The majority of this project is cutting pieces to size to hide the fact that the base is a pallet. Add armrests and pillows, and enjoy the great outdoors.

3. Hanging Bed

Looking for the perfect place to sip lemonade and read a book on the weekend after gardening? If you have a sturdy tree, there’s nothing better than a pallet swing bed. The best part is that screwing together two pallets to make the bed and adding pallets for a backrest is half the project. Strap some rope to the four corners and hang it up. Just make sure the bed is level.

4. Headboard

Speaking of beds, a pallet headboard carries the pallet theme inside while being stylish. Once again, this is as simple as measuring how big you want the headboard, ripping the pallets apart, and nailing the pieces together. Stain or paint to your tastes.

5. Garden Planter

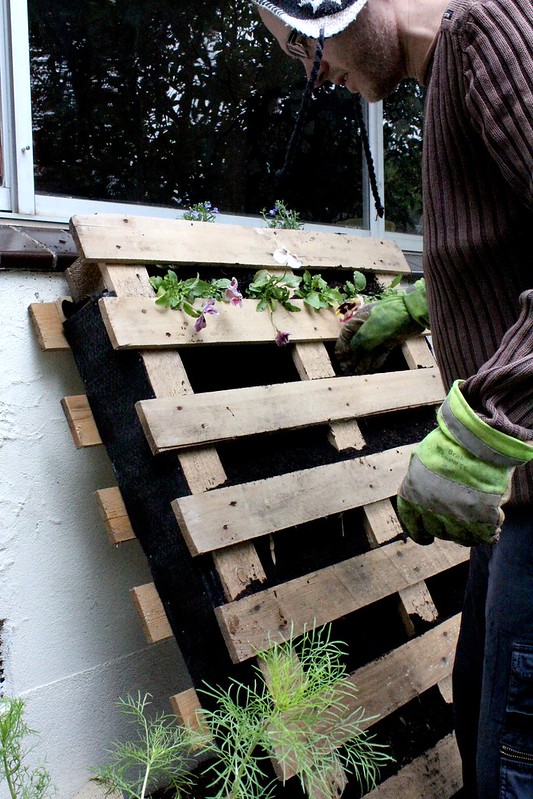
If you are on this site and don’t have a garden, it’s time to change that. Making your own planter from wood is already cheap and an afternoon’s leisurely work. Pallets, however, drive the cost down that much more. To give a planter the pallet look, leave gaps in between boards. As with the strawberry planter at the link, you can let bark and the plant fill in the gaps, or use planter lining. Feeling even lazier? Set a pallet upright, line the crossbars with planter lining, fill with dirt, and call it a vertical garden. Bonus points for planting edible flowers for not only practical but aesthetic purposes.
planting pallet
Source: Flickr user various brennemans (CC BY-SA 2.0)

6. Dog Bed Frame

Man’s best friend needs a place to sleep outside, too. A dog bed frame for a cushion and some blankets will ensure your pooch can hang around outside in comfort with you – especially if you are lounging on one of the earlier projects.

7. Shelving

Outside, pallet shelving can be used to store tools or toys. Inside, they fit nicely in a pantry, ready to hold canned goods. For inside shelves, all you need is an appropriate stain and possibly sealant, especially if the shelves will hold food. Outdoor shelves need to have weather-resistant sealant at the least, to prevent rot and damage. 

8. Shed

This idea, without a doubt, is the most involved project. It’s also extremely practical and can fit some of the previous projects inside. Behold: The pallet shed. Buying all the wood for a shed would be expensive. But pallet wood is anything but costly, leaving plenty of money for cinder blocks for a base, nails and screws, mortar, shingles, hardware to mount a door, and glass for windows. The original builder made a 20’x8’ shed for about $500. A shed from Home Depot will cost double that for half the space.

Conclusion

Overall, pallet projects are fairly easy ways to get into the DIY world.  A good suburban homesteading has certain skills that set him or her apart from the pack.  Being able to improvise and create solutions with their own hands is one of those.  These eight projects will get you moving in the right direction!

Pallet Projects For Suburban Homesteaders


Tactical Gear for Preppers – What You Wish You Had

Prepping is the act of staying well prepared in the event of war or an emergency.  That being said, preppers are a fickle bunch.  We run the gambit from veggie growing gardeners who want to provide for their family to full-out “I’m ready to fight during the end of days” warriors. Tactical gear is important for all but the most hippy, peace-loving among us preppers.  Whether it’s just a firearm to protect your home and loved ones or a full-up kit to survival a worst case scenario, I’ll help you determine what you need to feel comfortable and secure

Tactical Gear For Preppers?

Tactical gear is designed to accompany you in some situations, give you a quick and easy access to your tools/ammo and also give you a perfect chance of coming out of a dangerous situation alive.

Why do preppers need tactical gear?  First and foremost, it’s good to understand that this gear is used by military as well as law enforcement personnel. The reason why tactical gear is ideal for a prepper is because they help stay alert and defend your position in case of a disaster.

The reason why preppers prefer tactical gear over more commercial gear is because of its high-performance features. Preppers understand the many functions and tasks this gear is capable of performing without getting damaged.  The fact that military and law enforcement personnel rely on it proves its rugged and durable nature.

What Is The Best Tactical Gear?

Although there is a wide range of tactical gear available, not all are necessary in the life of a prepper. There is special gear you’ll need to consider for combat and there are those pieces of gear you can live without. I don’t actually mean the real thing (military personnel going on a mission) when I talk about combat. I’m referring to potential riots, clashes or even misunderstanding in a government where a state of emergency is issued. With those situations in mind, I can quickly highlight some of the tactical gear that may benefit preppers. These include:

  • Tactical Plate Carriers
  • Assault Packs
  • Tactical Helmets
  • A Side Arm
  • Tactical Boots
  • A Knife
  • Hand / Eye Protection
  • IFAK
  • Camouflage Suits

Tactical gear is much better than commercial gear due to its tougher fabrics, versatility and diversified features.  All of these items help to keep you protected and armed in case of a bad scenario.

Tactical Plate Carriers

A tactical plate carrier is an essential piece tactical gear that protects you against lethal gunshots. Plate carriers have a variety of uses such as paintball and law enforcement uses. Tactical plate carriers are categorized into four major sets which include premium plate carriers, camouflage vests, modular chest rigs and law enforcement vests.

Assault Packs

Assault packs are perfect for prepping activities. These units come in a variety of different sizes and are widely used in tactical missions, technical jobs, and other law enforcement activities. Always check on the quality, durability, weight, and comfort when purchasing an assault pack. Other factors you need to consider is whether your assault pack has multiple compartments and its ability to offer comprehensive storage in a wide range of settings.

Tactical Helmets

Helmets help to protect your head from any possible injuries while relocating/searching. Always make sure that it’s tested and designed to offer maximum protection to your head without exposing you to any serious head injuries when choosing a helmet. There are several types of tactical helmets designed to suit a particular mission. Some of these helmets including Advanced Combat Helmets (ACH), Modular Integrated Communications Helmets (MICH) and Airsoft Helmets are available in most military outlet stores at affordable prices.

 Tactical Boots

Tactical boots are used by law enforcement personnel, the military and firefighters to protect their feet against dangerous elements. They are available in a range of different types and designs to perfectly suit your intentions. Common types of boots available in the market include standard issue tactical boots, jump boots, tanker boots, desert boots and jungle boots.

Standard issue boots are made of waterproof leather material and are designed to offer maximum protection to your ankle and toes. These boots are suitable for all-terrain use and are best for combat and high altitude training.

Jump boots are designed for airborne forces and paratroopers. Introduced during WWII, these tactical boots have extended lacing and rigid toe caps to protect your ankle and toes against any injuries in case of a rough landing.

Tanker boots are made of fireproof hard leather that makes them resistant to high temperatures and unable to allow dangerous chemicals and spills reach your feet. Designed with straps instead of laces, these boots are perfect for heavy use due to their tough characteristics.

Hand / Eye Protection

Your hands and eyes are the essential weapons you own. It’s therefore important to keep them safe and in good working condition when using your tactical tools. Tactical gloves are made of high-quality materials such as nylon and leather.  They are traditionally used by firefighters, medical and military personnel. The various types of tactical gloves include all-weather shooting gloves, Condor Tactician gloves, KTS100 HWI Gear mechanical gloves and Blackhawk gloves.

Choosing the best ballistic glasses is another important aspect you need to consider as a prepper. Depending upon the environment, tactical goggles can offer a wide range of protection from sand and dust particles to small bomb fragments which can cause total or partial blindness to one’s eyes. Some of the best tactical goggles to consider include Pyramex I-Force Safety Goggles, ESS Profile TurboFan Goggles, ESS Fight Deck Military Goggles and Bolle X1000 Tactical Safety Goggles.  

Final Thoughts

There is a lot of other tactical gear which preppers can use to their advantage. Before making your purchase, however, it’s important that you figure out which loadouts are perfect for your intended purpose. Since these pieces of gear are relatively expensive, always look for loadouts which will suit your body type and needs. If you are interested in this kind of topic, then head over to solidgear.net for more information. 

Tactical Gear for Preppers - What You Wish You Had


Castle Doctrine: Keep Yourself Out Of Jail

One of the major concerns facing the prepper and homesteader community is self-defense.  Prepper and homesteader sites have articles on how to properly shoot a firearm or how to pick from the various survival knife brands. However, many blogs (my blog Living Dead Prepper is guilty as well) tend to neglect the legal aspects of self-defense.  This negligence is a mistake though as you’ll need to have at least a working knowledge of legal self-defense. The notable exception would be a total collapse of society.  This article will give you a starting point in learning the Castle Doctrine (CD) and the Modified Castle Doctrine.  Both of these doctrines are the primary US self-defense laws.

LEGAL DISCLAIMER:  THIS ARTICLE IS GENERAL INFORMATION AND IS NOT LEGAL ADVICE.  READ YOUR STATE’S SELF-DEFENSE LAWS TO PROPERLY UNDERSTAND YOUR STATE’S HOME SELF-DEFENSE STATUTE. BETTER YET, CONTACT AN EXPERIENCE LOCAL ATTORNEY.

The Castle Doctrine

The below principle should always guide you when it comes to protecting yourself and your family:

I’d rather be judged by twelve than carried by six.

You obviously want to avoid being judged by twelve if at all possible in the first place. In that sense, you owe it to both yourself and your family to learn your state’s self-defense laws.

You need to understand common law self-defense to best understand CD. Let’s address common law self-defense. (Self-Defense)

An Overview of Common Law Self-Defense

Please note: Common law is based upon previous court ruling and not written statutes.

Self-defense is an affirmative defense which allows you to reasonably use force against an intruder, or other criminals, without fear of arrest.

To show legal self-defense you must show the following:

  1. Immediate Threat: You must be, at the moment you or a loved one are attacked, afraid that you are in danger. Self-defense cannot be claimed if you drive ten miles to shoot someone who threatened you over the phone.
  2. Proportional Response: The use of force must be proportionate to the danger that you would reasonably think may happen to you or others if you were to do nothing. For example, an average sized adult would likely be guilty of murder if they shoot an unarmed, elderly female who is threatening to beat them up.

Home Self-Defense Doctrines

The Castle Doctrine and its variants evolved from the above self-defense laws. As a result, many of the common law self-defense concepts, like “Proportional Response” were put into legal statutes.

Castle Doctrine Overview

The predominant home self-defense laws in the USA are CD and Modified CD. Keep in mind that each state may have different variants of the CD. Many states have a different limitation on when, where and how an individual whose state is covered by the Castle Doctrine can legally use self-defense. This explanation of the Castle Doctrine will be based upon a general overview of the CD. I’ll not address any particular state’s specific Castle Doctrine statute.

Below are the main elements of the Castle Doctrine:

  1. Location: You must be physically inside where you live. (e.g. house, apartment, mobile home, etc.). You can’t shoot a burglar, on your front law, who is running away from you.
  2. Breaking and Entry: The bad guy must have either broken into your home or attempted to break into your home. The CD would not apply if you shoot someone who is breaking into a shed in your yard.
  3. Justification: Was your use of force reasonable? As explained earlier, reasonableness is based upon your particular situation. For example, it may not be considered reasonable to shoot a drunk who has wandered into your house passed out on your couch.
  4. Whether a shooting was reasonable can be dependent upon the district attorney, judge, jury and the state where the incident occurred.
  5. Duty to Retreat: Historically, to use the Castle Doctrine you must have first shown that you were unable to run to safety. This means that to use the CD defense you could only use deadly force as a last resort. The duty to retreat is currently only required in around half of the US States. Approximately half of the other states use the Modified Castle Doctrine.

The Modified Castle Law Doctrine

Under the Modified CD, you don’t have to retreat from an intruder when you’re in your house, yard or workplace.  In some states, your personally owned vehicle is covered under Modified CD. Thus, under the Modified CD, you can “Stand Your Ground,” in your residence and use deadly force without first seeing if there were avenues to escape.

Conclusion

Ultimately, a fundamental knowledge of your state’s home Castle Doctrine laws and using common sense are your best self-defense tools. You definitely should know whether your state uses the traditional Castle Doctrine or the Modified Castle Law Doctrine.

Above all, your self-defense strategy needs always to be based upon what is best for that particular situation. For example, just because you don’t have to retreat doesn’t mean that you should never attempt to run for safety.

You need to ask yourself: “Is is safer for me to run, hide, retreat or confront?”

Your final decision on whether to fight or flee ultimately needs to be based upon what is best for both yourself and your family or friends.


References:

http://criminal.findlaw.com/criminal-charges/may-i-shoot-an-intruder.html

Castle Doctrine


Bartering After SHTF: A Beginner’s Guide

I love bartering. I’ve been bartering since lunch period in elementary school where I would often trade a chocolate milk for a Lunchable pizza. I’ve bartered everything from CDs to subwoofers to paintball guns to high-end letterpress business cards from Lithuania.

Sure, bartering has its downfalls. Situations like…

  • Louis needs a cow and has chickens to trade. How many chickens equal a cow? Are they egg laying chickens? How old is the cow? There are a lot of variables and it is almost never a completely even trade.
  • Jennifer needs wool and has beans to swap. Chris has wool but doesn’t need beans, he needs corn. So now Jennifer has to find someone with corn who needs beans. This can get very complicated quickly

It’s easy to see why every culture has created some form of standardized currency to make these exchanges fair and simple.

Bartering During Currency Failures

Currency could fail for various reasons such as hyperinflation, natural disasters and a general SHTF scenario where the access to hard currency is limited or nonexistent.

In situations like hyperinflation, bartering would simply take the place of everyday currency transactions. Your life will continue as normal, you will simply trade items instead of money.

However, in a situation where access to hard currency is all but impossible, the dynamic changes to where people are worried about just surviving. Items like food, water, and medicine become high commodities in these kinds of situations. These are the types of scenarios you should be preparing for and ready to barter within.

Preparing For Bartering

So what should you do to prepare for these types of situation? It’s actually pretty easy to get started.

Bartering is just about trading something of value for something else of value. Price isn’t the factor, need and usability are. Just like in the movies where the hero on the run trades an expensive watch for a phone call. That call can save their lives but the watch won’t, even though it costs exponentially more during normal times.

Preparing for a bartering economy doesn’t have to be expensive and you don’t need to hoard rooms full of stores. Things as simple and cheap as canned food, lighters, batteries, bottled water, etc can be worth quite a lot in times of crisis. Many of the items that are great for bartering after SHTF are things you should already be stocking up on in case of an emergency anyway.

Here’s a short list of essential items (in no particular order) that will be worth their weight in gold if SHTF:

Short Term

Longer Term

  • Seeds
  • Animals for food – chickens, goats, cows, fish, etc
  • Building materials
  • Coffee
  • Toiletries – Toothbrushes, feminine hygiene products, soap, etc
  • Salt

These lists are in no way exhaustive or complete. I’m sure you can think of plenty more.

The best part is that the majority of these items are inexpensive so next time you’re at the store, just pick up a couple extra things. You’ll have a decent collection in no time and it’ll only cost you a few extra dollars every shopping trip.

Bartering Away From Home

What if you have to leave your home and/or cache of stores behind and can only grab your bug out bag? No worries. Remember that bartering is about trading something of value for something else of value. You can still provide value to someone with a service.

Think about going to your daily job.  You’re really just bartering your time and skills for currency. The same principle applies in a SHTF scenario. But, instead of time and skills for currency, you’ll be bartering for supplies.

Here are some skills that will be valuable after a disaster that you could be learning right now:

  • Repair – small engine, sewing, firearms, etc.
  • Medical – Treating wounds, diagnosing rashes, knowing which plants cure ailments, etc.
  • Hunting – Can catch game to trade or go on hunting parties for a group
  • Building – Carpentry, welding, simple architecture, etc.
  • Farming – Crops, livestock, animal husbandry, etc.
  • Bushcraft – Shelter, foraging, trapping, fire building, tracking, navigation, etc.
  • Cooking/Baking

Skill can be traded for one-time payments (fix an engine for a crate of food) or for more long-term scenarios (be the camp cook in exchange for protection and inclusion in the group).

Conclusion

Remember that society existed well before the invention of currency and can do so again without it. Bartering is one of our oldest skills and will continue to be important whether you’re trading pudding cups or cans of tuna.


You may have put a lot of thought into what will happen after a major disaster but are you prepared for bartering after SHTF? What will you trade?


Emergency Fund: Your Strongest Financial Asset

Every ounce of critical financial planning can go to waste if you don’t have an emergency fund to back it up.  Emergency funds are a lifesaver when unforeseen expenses crop up.

There are emergencies that need immediate attention such as a daily-use home appliance breaking down or car repairs demanding early intervention. Because these emergencies usually require your immediate attention, attaching a debit card or a check-writing facility to your short-term emergency fund can be of use. You will have immediate access to your funds putting you in a position to use them whenever the need strikes.

On the other hand, a long-term emergency fund saving can get you out of the woods in case of dire emergencies, not under your control such as a natural disaster or job loss. Long-term emergency funds can be stored in investments which may take several days to liquidate.  The short-term fund should hold you over until you’ve accessed these funds.

When Emergency Funds Really Save the Day

Realistically speaking, an emergency fund is not a “backup fund” you can use to buy anything you want. Learn to identify what a real emergency is and how it impacts your lifestyle in the long run. Examples might include:

  • A family emergency requires your attention and you need to make travel arrangements right away.
  • A major everyday appliance such as the dishwasher or refrigerator breaks down and you need it repaired/replaced.
  • You currently don’t have health insurance and suffer from a critical illness or injury which requires immediate medical care.
  • A car issue you can’t figure out which demands the attention of a mechanic.
  • The basement gets flooded due to a water heater problem.

Pay Off Your Debt First

Before planning an emergency fund, make sure all your debts are paid off. Large amounts of debt can be a real thorn in your side, particularly if you are paying high interest on them. Settle your debts and, under all circumstances, avoid the urge to accumulate more debt. Failure to pay your debt means you will continue to accumulate more debt (interest etc.) and may end up in hot water if your lender goes the legal way.

First, you have to make sure you don’t owe any back taxes from the IRS. Tax debt should be settled first to avoid unnecessary seizure of any properties you owe. Consulting a tax professional can have many advantages. They can help you through tax law, taking into account your financial situation, so that you pay back the smallest amount that is legally owed.

If you owe unsecured debt such as credit card bills, getting into a debt settlement program is one way you can free up more money to deal with monthly expenses and help settle debts within a reasonable time frame. Avoid bankruptcy as much as possible by exploring your debt relief options and invest in a debt settlement program to find closure fast. Remember, bankruptcy can have a lasting mark on your credit report.

When Should You Save?

It is generally a good practice to pay off all your debts before you start focusing on emergency fund savings. However, it’s permissible to start saving while you have some debt if you’re making all your mortgage payments on time. Make sure all your monthly credit card payments are being taken care of. Finally, you shouldn’t have any loans that are high interest and really low in terms of savings.

High-interest charges on ‘expensive debts’ make it more challenging to finance your emergency fund, so you need to clear those first.

Why Do I Need an Emergency Fund?

You need an emergency fund to fall back on in case a financial emergency arises. Knowing you have cash in hand will keep you trouble free. In addition to this, there are several other reasons why you need an emergency fund:

  • Life is unpredictable! You may lose your job or start making less money all of a sudden. In such times your emergency fund can be of much use. It will help cover your day to day expenses while you look for another job or ways improve your finances.
  • Health emergencies can arrive anytime. Sadly, your health insurance may not necessarily cover every hospital visit or medication expense. Have an emergency fund plan and you’ll never have to play the choosing game between your monthly rent and your well-being.
  • No matter how much we care, accidents can happen and may result in huge problems. Anything from your car breaking down to your house catching fire can be troublesome. In such conditions, your emergency fund can help bring you out of hot water.

A Backup Piggy Bank for Obligations, Not Entertainment or Desire

The whole idea behind emergency savings is to have a backup source for meeting life’s obligations, and not desires or what you consider ‘leisure’. Focus on the bare necessities only:

  • Mortgage payments when finances are tight
  • Automobile expenses outside of fuel and normal maintenance
  • Insurance
  • Utilities
  • Food
  • Healthcare etc.

There are taxes to be paid off and monthly or quarterly home maintenance. It’s always good to save a little extra which acts as a cushion should you find yourself unemployed.

Building Your Emergency Fund

When building your emergency fund, take the following into consideration:

How Big?

Your current financial status and insurance coverage decide whether you should have a big or small fund. Generally, it’s a good idea to have sufficient emergency savings to take care of 3-6 months’ worth living expenses. If you’re out of a job, it gives you enough time to find work while supplementing with unemployment benefits.

You need to do math and see how much you can afford to save every month after paying all your necessary expenses. Try to reduce unnecessary expenses so you can save even more.

Where Do I Keep it?

You should keep your savings in an account that allows you to withdraw funds whenever you need it. A checking account is an ideal account since it has little to no restrictions on withdrawals. However, the downside is that you have to do away with interest in most cases.

On the other hand, you may also choose a savings accounts. Your money will increase slightly each month due to interest, but you may have to deal with certain restrictions on withdrawals.

Ideally, you should keep your money in two places. A larger amount in a savings account – untouched until you really need it – and a smaller amount in a place more readily accessible.

Steps to Take in Advance

  • You need to have a monthly savings goal. Get in the habit of saving on a regular basis. Even a small percentage adds up. It can be a percentage of your net income or a fixed amount, such as $500 per month. You should let this amount decide your other expenditures as a rule.
  • If there’s any money left in your checking account before the start of the next month, move some or all of it to your emergency account.
  • When filing taxes, you might want to have your refund directly transferred to your emergency savings, as it could be in the thousands.
  • If you’re not saving enough, consider cutting back monthly costs through carpooling, eating out less frequently, not throwing away leftovers or having coffee at expensive places.
  • Get a second job or freelance doing what you love to save extra for your emergency cash savings. Sell unwanted items in your house.
  • Every few months, it’s a good idea to check how much you’ve saved. This will help you see if you’re reaching your goals or if you need changes in your plan. Plus, knowing how much money you have will also allow you to take better decisions in case of an emergency.

Final Thoughts

Everyone needs to have an emergency fund for when things get rough. When you fail to have a cash reserve for these unexpected situations, you’ll be left with little choice but to reach for the credit card, which is something you want to avoid all together.

Say no to debt, find relief from it fast and always learn to distinguish between necessities and luxuries when saving up those extra dollars for emergencies.

Sources:


emergency fund


7 Steps For Hurricane Readiness

There is no doubt about it – natural disasters are scary – and each part of the beautiful U.S. of A. has its own special disaster you may need to prepare for. Growing up in the Northeast, hurricanes are my forte and I’d love to share with you some tips and tricks to be ready to go this hurricane season!

If you’re never prepared for hurricane season before, you may think it requires more time (and more money) than it actually does. You may be surprised to learn that you can check most of the points off your hurricane readiness to-do list within a weekend or less.

Not sure where to begin? Here is where you can start!

How Prepared?

The first question to ask yourself is: How prepared do I need to be?

Residents of Fort Lauderdale, FL, will have different preparation needs than residents in Harrisburg, PA.

Know the risks for your area. Are you likely to see the eye of the hurricane? Will you just see higher rainfall and a few downed limbs? Are you in a flood zone? Will winds get high enough to pick up large debris?

There’s no point in preparing like you live in Key West, FL if you live in Albany, NY. Find out the risks for your area before making any plans or buying any supplies.

Know Who to Trust

That may sound ominous, but all it really means is: Where will you get your news?

Your Auntie Em’s Facebook feed may be helpful for personalized, local information. Tweets and updates from locals can help alert you to a tree that’s blocking Market Street or the power lines down on Main. However, you should look elsewhere for your primary source of storm information.

The National Oceanic and Atmospheric Administration (NOAA) has two Hurricane Centers that are the most trusted sources of up-to-date hurricane information. NOAA broadcasts emergency information through the National Weather Service. You can tune into one of seven frequencies, though you may need a special radio to pick them up.

A list of emergency management agencies is also available through FEMA.

Don’t forget to check for official social media accounts for your trusted sources and, if possible, sign up for a text alert system.

Double Check Your Insurance

You know what they say about assuming, right?

Don’t assume that your insurance will cover you in the event of hurricane damage. Skip the internet search and word of mouth and head straight for the source. Call your insurance agent, sit on hold for as long as necessary (fold laundry or do something semi-productive while you wait – it helps!), and check to see what is covered under your policy.

Remember that most insurances do not provide flood coverage. If you’re in a flood zone, consider purchasing a separate flood insurance policy.

Stock Up on Supplies

Make sure you have the supplies you need to keep your family fed and functioning in the event you need to weather a few days stuck in your home.

A basic emergency kit should include:

  • Food and water for three days (allow one gallon of water per person, per day – don’t forget water for your pets)
  • Manual can opener and a multipurpose tool
  • Battery-operated radio
  • Flashlight
  • Extra Batteries
  • Cash (lower denominations help)
  • Copies of Important Documents
  • First Aid Kit
  • Child and Pet Supplies (formula, diapers, leashes, etc.)
  • List of Emergency Numbers

Make sure your cell phones and laptops are fully charged in preparation for a storm. In the event of a power outage, you can use your laptop to charge your phone.

For a more comprehensive list of what you should include in your emergency kit, check out further recommendations from the CDC.

Hurricane Property Prep

You can make both last-minute and long-term hurricane preparations to your property.

Keep up with outdoor maintenance. Trim tree limbs that are too close to the house. Check for and remove any dead limbs or trees before Mother Nature has a chance to do it for you. Make smart landscaping choices like opting for mulch instead of rocks. Keep gutters clear of debris.

Have shutters ready to secure and cover windows and doors. You can purchase tested and approved shutters that are designed for hurricane conditions or you can use tutorials available through flash.org to create your own plywood coverings. Don’t forget to reinforce your garage door as well. Garage doors can be too light and flimsy to withstand hurricane conditions on their own.

If a hurricane seems imminent, move outdoor furniture, grills, and other items into the house or garage. Move your car into the garage as well.

Make an Evacuation Plan

Don’t wait until a hurricane is happening to make an evacuation plan.

Know where your local shelters are located and pick an evacuation point in the event you need to leave your area completely. It doesn’t have to be across the country, as a friend or family member located outside the evacuation zone will do just fine.

Map out your routes ahead of time and make a point to research and review extreme weather driving tips.

Write It Down

An emergency situation can throw off the best of us. Don’t rely on memory alone: Write down your emergency plans and keep them easily accessible.

A family binder is a great place to store important information, including emergency plans. Fill that section with:

  • Emergency Numbers
  • Emergency Supply Inventory
  • Property Preparedness Checklist
  • First Aid Tips
  • Evacuation Plan and Mapped Routes

You may also find it helpful to include a short list of items to grab in the event of an evacuation. A list like this will keep you from forgetting important, portable items and keep you from wasting time in the moment, trying to decide what to take.

Wrap-Up

This may seem like a ridiculous amount of information, but there’s no need to feel overwhelmed! Bring the whole family on board and set aside a work weekend. Together you can quickly and easily get yourselves and your home ready to face any emergency safely!

Hurricane Readiness


6 Quick Tips for Managing Student Loan Debt

Statistics show that about 33% of all Americans age 25 and older have college degrees and those numbers are rising over time.  Unfortunately, many Americans use loans to finance this higher education.  Nothing welcomes your adulthood like getting the first student loan bill in the mail.  These bills can control your life if you’re careful.  And, while we don’t recommend taking loans in the first place, following these six steps will help you steer clear of trouble and manage your debt in a responsible manner:

1. Don’t Ignore Your Student Loan

Most of us would agree that student loans are no fun to pay back.  Completely ignoring them, however, will lead to serious consequences in both your credit rating and financial future. Make sure you start paying them off right after finishing college.  

Editor’s Note: College loans typically give you a six month grace period from graduation before you have to start paying them off.

2. Set Up A Budget

Your lifestyle completely changes after college.  You’ll need to start paying attention more to your financial surroundings and managing the flow of money through your accounts.  Part of managing your income and expenses will involve tackling your student loans.

Monitor all your incomes (paychecks mostly) and expenses (rent, food, utilities, student loan payments, etc.) and create a budget off this information.  It will help you determine your repayment strategy and show you where you can and cannot spend money.

There are apps and programs that can help. Third Party phone applications like You Need A Budget (YNAB), Mvelopes, and Mint, as well as software programs like Zilchworks and Quicken, can help you get on track.

3. Set An Affordable Monthly Payment

There is no one solution for everyone. Once you’ve set up your budget you’ll be able to get a clearer picture of what you’re capable of committing to pay each month – no less than the minimum of course so you don’t default.  If you can’t handle the minimum for whatever reason, it is best to talk to the loan manager as they are usually willing to work with you.  It is much better to set up smaller monthly payments over a longer time than default on your loan.

You will get rid of your loan sooner (and pay less interest) if you pay a higher amount than the monthly minimum.  This approach should be a goal, however.  Minimum payments should be considered mandatory for the reasons we’ve listed above.  Side note – if you have a lot of debt, consider looking into the debt snowball payment method as a way of getting out of debt faster.  It won’t be easier, but it works..

The recently created Pay As You Earn Repayment Plan (PAYE) also aims to make paying off student loans more manageable.  

Editor’s Note: I have no experience with this plan so please check with consultants to see if your loan and circumstances qualify you for the program.

4. Research Forgiveness Options

There are some lawful ways to have your student loans dismissed.  There are also certain criteria you must meet to qualify for a student loan forgiveness program. Research available student loan forgiveness programs at the state and federal levels to see if there is a student loan forgiveness program that suits your situation.  In the meantime, make sure you’re keeping up with your minimum payments.

5. Set Up Automatic Payment Options

One of the best solutions for student loan repayment is to opt for an automatic payment option.  These programs will automatically deduct a preset amount each month from your account to pay off the loan.  You will not have to worry about writing a check each month as it will be deducted automatically on a certain date.

Typically, you have the option of picking which day of the month you pay the loan.  This option allows you to do helpful things like schedule your payment for the day after your paycheck is credited to your account.

This approach takes the responsibility of remembering to write a check and mail it (or even just log-in and process payment) each month out of your hands and keeps your credit and status in good standing.

6. Make Extra Payments Whenever Possible

We touched on this item in Step 2, but the best tip for managing your student loans (after not taking them) is to pay them off as early as possible.  You can do this by making extra payments whenever you have a few dollars in your pocket.

When making extra payments, make sure it is explicitly clear that the extra money in your payment is to be put against the principle of the loan and not against the next future payment.  Also, if you have multiple student loans, always apply any extra payments to the loan with the highest interest level first.  This approach will reduce the amount of interest you pay and reduce the total cost of your loan over time.

Conclusion

Student loans are beastly things that are best avoided.  That being said, if you have them, it’s best to service them as much as possible.  We recommend following these six steps and also consulting with the most experienced, informed and active student debt consultants you can find in order to resolve your debt the most beneficial way possible to your current situation. Student loans can be trying but they are survivable.


manage your student loan


Introduction To Backyard Aquaponics

The ability to grow plants and raise fish organically without the use of pesticides or fertilizers is accomplished through a method called aquaponics. This system of growing plants and raising fish without the use of soil was discovered by researchers from the University of Virgin Islands while looking for ways through which you can grow plants organically.  And, with just a little sweat equity and a few dollars, you too can have a backyard aquaponics system working for you!

How Does It Work?

Basically, aquaponics works in a win-win situation. What happens is that it combines the traditional aquaculture with hydroponics. In aquaponics, plants feed on the effluents released by aquatic animals.  Those plants, in turn, purify water to keep the fish more comfortable.

Backyard Aquaponics

Between 2006 and 2007, this technique was widely adopted and is now commercially used on many farms to grow plants organically. According to some farmers, aquaponics grows plants 50%-100% faster as compared to inorganic farming. With just a small amount of space, you’re able to deliver ten times more as compared to older methods.

What Is Aquaponics?

Aquaponics is essentially the combination of aquaculture (raising fish) and hydroponics (growing plants). This process takes advantage of the aquatic affluent (fish waste) deposited in water to provide essential nutrients to your plants. When the water is affluent rich, it becomes toxic to the aquatic animals. During this stage, plants absorb and use the nutrients eliminating the high water toxicity for your fish to survive.

Backyard AquaponicsThere are so many benefits you’ll enjoy when you make a backyard aquaponic system. Unlike a fish pond where you’ll have to exchange water every now and then, an aquaponic system relies on the relationship between plants and aquatic animals. Freshwater fish release ammonia which is converted to nitrite by a nitrifying bacterium called Nitrosomonas. Another nitrifying bacterium called Nitrobacter converts the nitrite to nitrate which is used by the plants to freshen the water for the fish. This process of converting ammonia to nitrite then to nitrate is referred to as “the nitrogen cycle.”

Types of Aquaponic Systems

There are three major types of Aquaponic systems:

Media Filled Beds

This method is the simplest and is commonly used in most backyard aquaponics systems. It involves filling containers with medium and small clay pebbles then planting seedlings directly into the media.

Fish tank water is then pumped over the media to allow the plants to feed on the excess nutrients. The medium clay pebbles act as biological filters where they help to eliminate toxins giving your fish fresh and clean water in the long run.

There are two major ways which this Aquaponics system can be operated:  continuous water flow method and the flood and drain (also known as ebb and flow) method.

Nutrient Film Technique

This method involves pumping nutrient-rich fish water through PVC pipes. Plants are grown inside cups with small holes at the bottom to allow the roots to reach the water in the PVC gutters.

It’s important to understand that this method is only suitable for leafy green plants with small root systems and not larger plants with bigger, invasive roots.

Deep Water Culture

This method is commonly used in both commercial and backyard aquaponics systems because it’s relatively cheaper to setup and operate. This method uses a foam “raft” which floats on top of the water. Plants are held in holes made in the raft in a way that the roots dangle into the water. For perfect results, fish water can either be pumped on the floating racks or the racks can be placed directly on the fish water.

Benefits of a Backyard Aquaponics System

Setting up a backyard aquaponics system in your garden comes with lots of benefits such as environmental improvement, better health, and higher quality nutrition. This section will review some of the essential benefits which farmers can expect to enjoy.

Saves Space

Unlike other gardening methods, aquaponics system allows you to plant your seedlings close together thus saving on space. Since this method involves submerging plant roots in nutrient-rich water, there is less overcrowding which helps you save on space as compared to other gardening techniques.

No Weeding

Another benefit of backyard aquaponics system is that you don’t have to weed anymore. This method doesn’t encourage the growth of weeds since there is no soil involved. Farmers are able to enjoy the freedom of growing plants at home without weeding.

No Soil Pests

Since Aquaponics doesn’t rely on soil, farmers are relieved the burden of using pesticides to eliminate soil pests. Pesticides destroy the plant slowly over time due to toxins absorbed by the plant.

Plants Grow Faster

Backyard aquaponics system allows plants to access nutrients for 24 hours each day making them grow faster. According to research, vegetables such as lettuce have been proven to grow twice as fast as compared to when planted normally on the soil.

Making Your Own Backyard Aquaponics System

Backyard Aquaponics

There are many ways through which you can make your own backyard aquaponics system. Regardless of the method you choose, always ensure that your system is able to grow plants in a way that confers most of the environmental benefits such as low environmental impacts and water efficiency.

Without wasting time, we will go through a step by step program on how to make a Flood and Drain system.

Flood and drain system

Necessary Equipment and Material

Build Process

  1. Place your fish tank on a flat surface away from direct sun to reduce algae growth.
  2. Place the pump and feed pipe in the fish tank.
  3. Place the grow bed near the fish tank. Fill it with gravel and make sure it’s close to the fill pipe.  Also, make sure the drain pipe from the grow bed feeds directly into the fish tank.
  4. Install the timer on the pump and set it to cycle for 15min on, 45 min off.
  5. Join the pipes and the pump together to connect the fish tank with the grow bed. Also, remember to connect the overflow drain in the grow bed to remove water.
  6. Plant your seedlings into the grow bed and place your fish inside the fish tank.
  7. Test your fish water to determine the level of Ammonium, nitrite, and nitrate. If you notice that the pH level is high or low, you can adjust it accordingly to keep the water neutral.
  8. Turn on the pump to start the cycling process. This involves circulating nutrient-rich water from the fish tank to the grow bed then back to the tank again. After a few days, you’ll notice that your seedlings are growing; a milestone which reveals that your aquaponics system was successfully established.

Conclusion

In summary, there are tons of benefits which farmers enjoy once they set up a backyard aquaponics system. The system is cost efficient and makes backyard gardening more productive and economical. According to research, aquaponic systems use about 1/10th the amount of water used when farming on the ground. This technique helps you produce a tremendous amount of fish and vegetables within a short time in a small area.

backyard aquaponics