1

Toolbox Build: Introduction

Tools and the act of building out a toolbox were a right of passage in my family.  My grandfathers were both tradesmen – a welder and a naval diesel mechanic – and my father is a plumber.  The ability to work with your hands was almost a requirement from the womb.  All of these men were critical in both teaching me how to work with my hands but also how to properly use all different kinds of tools.  Fortunately, these men also took great pride in helping me put together a toolbox that would help me later in life.  In this article, I’ll introduce you to the methodology of building a toolbox for your suburban homestead and what kind of tools you should have in it.

Why Should You Have A Toolbox?

You’re a suburban homesteader, right? That means you have many different things to do on your property: re-plumb a faucet, get electricity to your shed, fix a hole in your wall, build a garden box, etc.

And you have the right tools to do that with, right? Right?

What’s that you say? You don’t have a fully outfitted toolbox?

It’s OK. I’m here to help you with that problem. Every suburban homesteader – heck, every person – should have a toolbox that is fully stocked to handle any problems you might run across at home. Having the right tools to fix any problem or complete any project you identify can save you hundreds, if not thousands, of dollars. It will also provide a sense of pride and accomplishment knowing that you’ve taken care of it at home.

Cost vs Quality

Quality trumps cost when it comes to tools any day of the week, and twice on the day something breaks around the house!

Being a suburban homesteader and the son of a professional plumber, I know the value of a quality tool. I also know the cost of an inferior, less expensive, tool.

It’s quite easy to go to Walmart today and put together a cheap, Chinese-made, tool set for less than $50. Anyone can do it. And guess what – they’re going to be replacing some of those tools after their first or second use.

If you spend the money and buy quality tools, you’ll be happier in the long run and spend less money over time.

So where do you start with buying quality tools?

I used to recommend leaning towards Craftsman tools. When I was growing up, they were pretty durable, American made, tools and they had a lifetime warranty (I think the hand tools still do). They weren’t overly expensive and could be found at any Sears store.

I still have a lot of Craftsman tools in my collection, but I lean towards Snap On tools right now if cost isn’t a concern.  That being said, I have quality tools from all kind of vendors now including Craftsman, Snap On, Stanley, Irwin, and others.  Sometimes it takes a little hunting and pecking, but you can find a quality tool from almost any manufacturer if you look hard enough.

Take Time Building Your Toolbox

You won’t build your entire toolbox right away, nor should you.

As I’ve already mentioned, it’s tough to afford a complete set right away. Add that to the fact you don’t know what you need and you’ve got a reason to build as you go.

My typical suggestion is to buy tools based on your needs. Start with a quality toolbox to place them in (see the next article in this series) and then grow from there. The next time you have a project to do – be it a repair or a new construction – buy the appropriate tools.

You’ll start to learn more about your preferences, what tools you like and what brands you prefer as you move through projects. Likewise, you’ll spend less money buying tools you don’t need and allow yourself to purchase higher quality tools.

All that being said, we’re going to spend the next few week laying out a basic toolbox and set of tools that every suburban homesteader and homeowner/renter should own.

Why You Should Trust Me

Why trust the Suburban Steader’s opinion on tools? He’s just some dude on the internet, right?

Not really.

I mean, I do write this blog, but I’m also a homeowner and suburban homesteader. In addition, I’m the son of a lifetime plumber.

Add all of that up and I can tell you that I’ve been using tools since pretty much the day I could walk.

I understand the demands of a suburban homesteader in building a toolbox and know what you’ll need. I’m also a mechanical engineer by trade.  I know quality tools when I see them.

My Suggestions – Not Just Shilling Gear

I am going to make suggestions for specific tools as we progress through the weeks of this series. These tools are suggested for two reasons:

  1. I use them
  2. They pass my durability, cost and quality requirements.

I will provide links to buy these tools. And, yes, I do get a little kickback if you buy them through the link (there’s no additional cost to you). But, by no means should you buy these tools just because I said so. If I recommend a DeWalt tool and you like Makita, go with the Makita. I’m recommending tools that work for me and I believe will work for you. You have to decide what you like the best and build your home toolbox off those decisions.

But, by no means should you buy these tools just because I said so. If I recommend a DeWalt tool and you like Makita, go with the Makita. I’m recommending tools that work for me and I believe will work for you. You have to decide what you like the best and build your home toolbox off those decisions.

You have to decide what you like the best and build your home toolbox off those decisions.

That being said, I do appreciate any purchases you make through the links I provide as it helps support Suburban Steader and keeps the content coming your way.

What’s Next?

I hope you enjoyed this general introduction into a suburban toolbox and why it is important.  In the weeks and months to come, I will explore the tools that I think are crucial to building a basic suburban toolbox and make suggestions for you.  Stay tuned – this could get interesting!

Toolbox Build: Introduction


Pallet Projects For Suburban Homesteaders

I recently bought a brand-new house in the suburbs of Boise, Idaho. One of the best things about the suburbs is the ease of access to places with pallets, which you can get for free or for just a few dollars. Here’s a great guide for how to pick a suitable pallet and to tell whether they are heat or chemically treated. Disassembling is quite easy, providing the raw materials for projects.

First, an important note: Be sure to clean and sanitize the wood no matter whether you have reclaimed wood in the form of a pallet, a local seller, or from your own tree.  It could carry germs into your house. Cleaning will also help eliminate potential slivers. Once done and dried, you are ready to start your projects.

Pallet Projects

1. Love Seat

Although the instructions for this love seat call for plywood, pallet boards work just as well. Cut a template for the seat portion.  Make sure it will be a comfortable seat by comparing the curves to a couch. Then, seal and stain the wood.  Finally, glue or nail everything together. This piece goes perfect with a garden – but we’ll get to garden projects later.

2. Patio Couch

Have room on your patio for more than just a love seat? Upgrade to a full L-shaped couch. The majority of this project is cutting pieces to size to hide the fact that the base is a pallet. Add armrests and pillows, and enjoy the great outdoors.

3. Hanging Bed

Looking for the perfect place to sip lemonade and read a book on the weekend after gardening? If you have a sturdy tree, there’s nothing better than a pallet swing bed. The best part is that screwing together two pallets to make the bed and adding pallets for a backrest is half the project. Strap some rope to the four corners and hang it up. Just make sure the bed is level.

4. Headboard

Speaking of beds, a pallet headboard carries the pallet theme inside while being stylish. Once again, this is as simple as measuring how big you want the headboard, ripping the pallets apart, and nailing the pieces together. Stain or paint to your tastes.

5. Garden Planter

If you are on this site and don’t have a garden, it’s time to change that. Making your own planter from wood is already cheap and an afternoon’s leisurely work. Pallets, however, drive the cost down that much more. To give a planter the pallet look, leave gaps in between boards. As with the strawberry planter at the link, you can let bark and the plant fill in the gaps, or use planter lining. Feeling even lazier? Set a pallet upright, line the crossbars with planter lining, fill with dirt, and call it a vertical garden. Bonus points for planting edible flowers for not only practical but aesthetic purposes.
planting pallet
Source: Flickr user various brennemans (CC BY-SA 2.0)

6. Dog Bed Frame

Man’s best friend needs a place to sleep outside, too. A dog bed frame for a cushion and some blankets will ensure your pooch can hang around outside in comfort with you – especially if you are lounging on one of the earlier projects.

7. Shelving

Outside, pallet shelving can be used to store tools or toys. Inside, they fit nicely in a pantry, ready to hold canned goods. For inside shelves, all you need is an appropriate stain and possibly sealant, especially if the shelves will hold food. Outdoor shelves need to have weather-resistant sealant at the least, to prevent rot and damage. 

8. Shed

This idea, without a doubt, is the most involved project. It’s also extremely practical and can fit some of the previous projects inside. Behold: The pallet shed. Buying all the wood for a shed would be expensive. But pallet wood is anything but costly, leaving plenty of money for cinder blocks for a base, nails and screws, mortar, shingles, hardware to mount a door, and glass for windows. The original builder made a 20’x8’ shed for about $500. A shed from Home Depot will cost double that for half the space.

Conclusion

Overall, pallet projects are fairly easy ways to get into the DIY world.  A good suburban homesteading has certain skills that set him or her apart from the pack.  Being able to improvise and create solutions with their own hands is one of those.  These eight projects will get you moving in the right direction!

Pallet Projects For Suburban Homesteaders


6 Quick Tips for Managing Student Loan Debt

Statistics show that about 33% of all Americans age 25 and older have college degrees and those numbers are rising over time.  Unfortunately, many Americans use loans to finance this higher education.  Nothing welcomes your adulthood like getting the first student loan bill in the mail.  These bills can control your life if you’re careful.  And, while we don’t recommend taking loans in the first place, following these six steps will help you steer clear of trouble and manage your debt in a responsible manner:

1. Don’t Ignore Your Student Loan

Most of us would agree that student loans are no fun to pay back.  Completely ignoring them, however, will lead to serious consequences in both your credit rating and financial future. Make sure you start paying them off right after finishing college.  

Editor’s Note: College loans typically give you a six month grace period from graduation before you have to start paying them off.

2. Set Up A Budget

Your lifestyle completely changes after college.  You’ll need to start paying attention more to your financial surroundings and managing the flow of money through your accounts.  Part of managing your income and expenses will involve tackling your student loans.

Monitor all your incomes (paychecks mostly) and expenses (rent, food, utilities, student loan payments, etc.) and create a budget off this information.  It will help you determine your repayment strategy and show you where you can and cannot spend money.

There are apps and programs that can help. Third Party phone applications like You Need A Budget (YNAB), Mvelopes, and Mint, as well as software programs like Zilchworks and Quicken, can help you get on track.

3. Set An Affordable Monthly Payment

There is no one solution for everyone. Once you’ve set up your budget you’ll be able to get a clearer picture of what you’re capable of committing to pay each month – no less than the minimum of course so you don’t default.  If you can’t handle the minimum for whatever reason, it is best to talk to the loan manager as they are usually willing to work with you.  It is much better to set up smaller monthly payments over a longer time than default on your loan.

You will get rid of your loan sooner (and pay less interest) if you pay a higher amount than the monthly minimum.  This approach should be a goal, however.  Minimum payments should be considered mandatory for the reasons we’ve listed above.  Side note – if you have a lot of debt, consider looking into the debt snowball payment method as a way of getting out of debt faster.  It won’t be easier, but it works..

The recently created Pay As You Earn Repayment Plan (PAYE) also aims to make paying off student loans more manageable.  

Editor’s Note: I have no experience with this plan so please check with consultants to see if your loan and circumstances qualify you for the program.

4. Research Forgiveness Options

There are some lawful ways to have your student loans dismissed.  There are also certain criteria you must meet to qualify for a student loan forgiveness program. Research available student loan forgiveness programs at the state and federal levels to see if there is a student loan forgiveness program that suits your situation.  In the meantime, make sure you’re keeping up with your minimum payments.

5. Set Up Automatic Payment Options

One of the best solutions for student loan repayment is to opt for an automatic payment option.  These programs will automatically deduct a preset amount each month from your account to pay off the loan.  You will not have to worry about writing a check each month as it will be deducted automatically on a certain date.

Typically, you have the option of picking which day of the month you pay the loan.  This option allows you to do helpful things like schedule your payment for the day after your paycheck is credited to your account.

This approach takes the responsibility of remembering to write a check and mail it (or even just log-in and process payment) each month out of your hands and keeps your credit and status in good standing.

6. Make Extra Payments Whenever Possible

We touched on this item in Step 2, but the best tip for managing your student loans (after not taking them) is to pay them off as early as possible.  You can do this by making extra payments whenever you have a few dollars in your pocket.

When making extra payments, make sure it is explicitly clear that the extra money in your payment is to be put against the principle of the loan and not against the next future payment.  Also, if you have multiple student loans, always apply any extra payments to the loan with the highest interest level first.  This approach will reduce the amount of interest you pay and reduce the total cost of your loan over time.

Conclusion

Student loans are beastly things that are best avoided.  That being said, if you have them, it’s best to service them as much as possible.  We recommend following these six steps and also consulting with the most experienced, informed and active student debt consultants you can find in order to resolve your debt the most beneficial way possible to your current situation. Student loans can be trying but they are survivable.


manage your student loan


Introduction To Backyard Aquaponics

The ability to grow plants and raise fish organically without the use of pesticides or fertilizers is accomplished through a method called aquaponics. This system of growing plants and raising fish without the use of soil was discovered by researchers from the University of Virgin Islands while looking for ways through which you can grow plants organically.  And, with just a little sweat equity and a few dollars, you too can have a backyard aquaponics system working for you!

How Does It Work?

Basically, aquaponics works in a win-win situation. What happens is that it combines the traditional aquaculture with hydroponics. In aquaponics, plants feed on the effluents released by aquatic animals.  Those plants, in turn, purify water to keep the fish more comfortable.

Backyard Aquaponics

Between 2006 and 2007, this technique was widely adopted and is now commercially used on many farms to grow plants organically. According to some farmers, aquaponics grows plants 50%-100% faster as compared to inorganic farming. With just a small amount of space, you’re able to deliver ten times more as compared to older methods.

What Is Aquaponics?

Aquaponics is essentially the combination of aquaculture (raising fish) and hydroponics (growing plants). This process takes advantage of the aquatic affluent (fish waste) deposited in water to provide essential nutrients to your plants. When the water is affluent rich, it becomes toxic to the aquatic animals. During this stage, plants absorb and use the nutrients eliminating the high water toxicity for your fish to survive.

Backyard Aquaponics
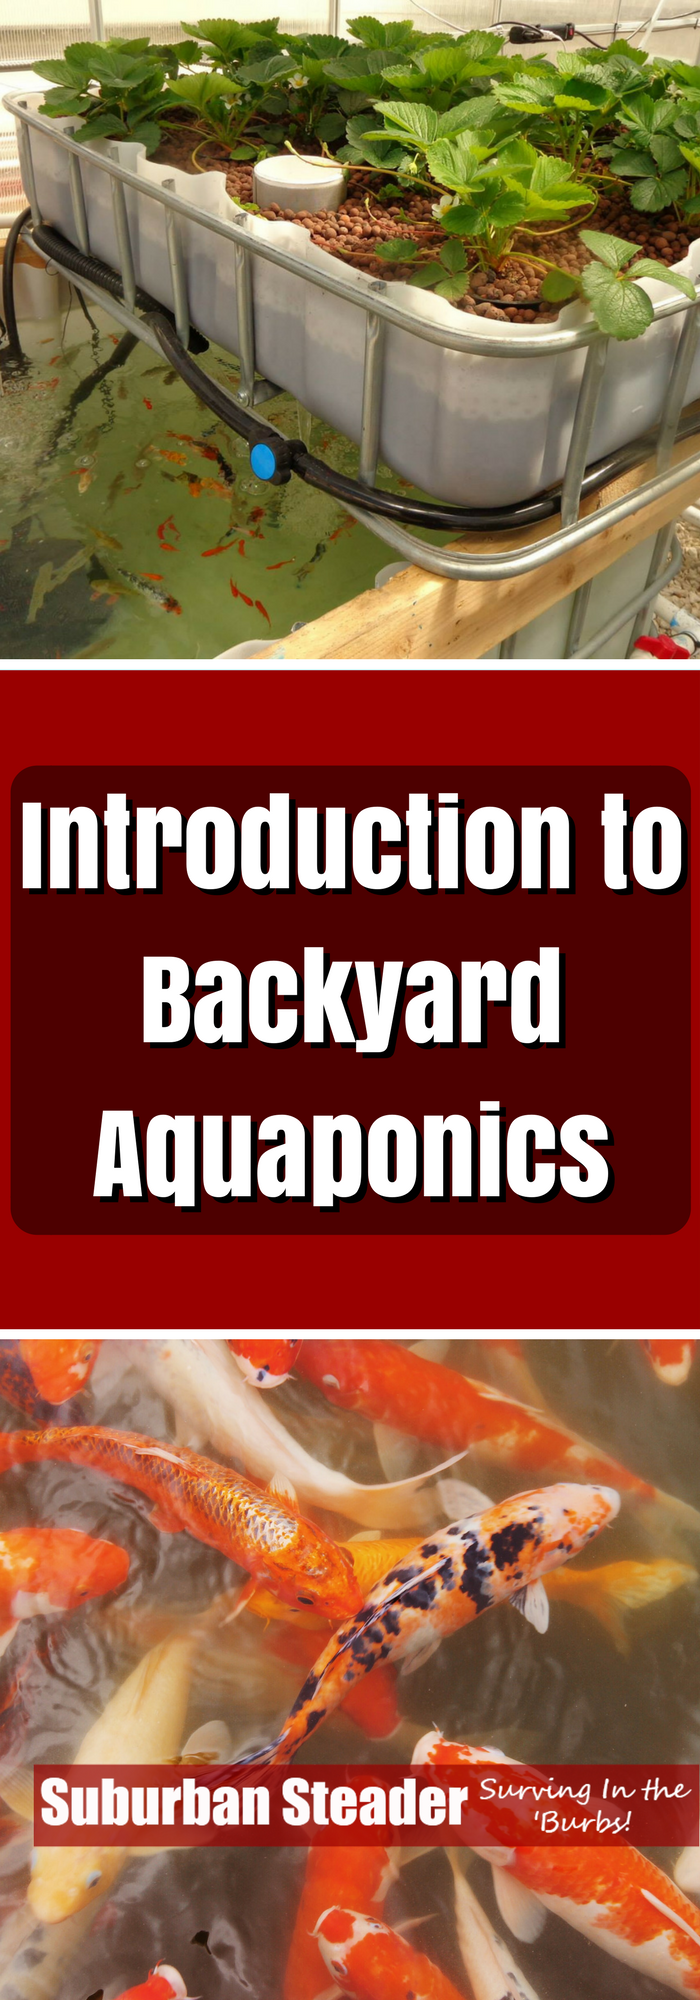
There are so many benefits you’ll enjoy when you make a backyard aquaponic system. Unlike a fish pond where you’ll have to exchange water every now and then, an aquaponic system relies on the relationship between plants and aquatic animals. Freshwater fish release ammonia which is converted to nitrite by a nitrifying bacterium called Nitrosomonas. Another nitrifying bacterium called Nitrobacter converts the nitrite to nitrate which is used by the plants to freshen the water for the fish. This process of converting ammonia to nitrite then to nitrate is referred to as “the nitrogen cycle.”

Types of Aquaponic Systems

There are three major types of Aquaponic systems:

Media Filled Beds

This method is the simplest and is commonly used in most backyard aquaponics systems. It involves filling containers with medium and small clay pebbles then planting seedlings directly into the media.

Fish tank water is then pumped over the media to allow the plants to feed on the excess nutrients. The medium clay pebbles act as biological filters where they help to eliminate toxins giving your fish fresh and clean water in the long run.

There are two major ways which this Aquaponics system can be operated:  continuous water flow method and the flood and drain (also known as ebb and flow) method.

Nutrient Film Technique

This method involves pumping nutrient-rich fish water through PVC pipes. Plants are grown inside cups with small holes at the bottom to allow the roots to reach the water in the PVC gutters.

It’s important to understand that this method is only suitable for leafy green plants with small root systems and not larger plants with bigger, invasive roots.

Deep Water Culture

This method is commonly used in both commercial and backyard aquaponics systems because it’s relatively cheaper to setup and operate. This method uses a foam “raft” which floats on top of the water. Plants are held in holes made in the raft in a way that the roots dangle into the water. For perfect results, fish water can either be pumped on the floating racks or the racks can be placed directly on the fish water.

Benefits of a Backyard Aquaponics System

Setting up a backyard aquaponics system in your garden comes with lots of benefits such as environmental improvement, better health, and higher quality nutrition. This section will review some of the essential benefits which farmers can expect to enjoy.

Saves Space

Unlike other gardening methods, aquaponics system allows you to plant your seedlings close together thus saving on space. Since this method involves submerging plant roots in nutrient-rich water, there is less overcrowding which helps you save on space as compared to other gardening techniques.

No Weeding

Another benefit of backyard aquaponics system is that you don’t have to weed anymore. This method doesn’t encourage the growth of weeds since there is no soil involved. Farmers are able to enjoy the freedom of growing plants at home without weeding.

No Soil Pests

Since Aquaponics doesn’t rely on soil, farmers are relieved the burden of using pesticides to eliminate soil pests. Pesticides destroy the plant slowly over time due to toxins absorbed by the plant.

Plants Grow Faster

Backyard aquaponics system allows plants to access nutrients for 24 hours each day making them grow faster. According to research, vegetables such as lettuce have been proven to grow twice as fast as compared to when planted normally on the soil.

Making Your Own Backyard Aquaponics System

Backyard Aquaponics

There are many ways through which you can make your own backyard aquaponics system. Regardless of the method you choose, always ensure that your system is able to grow plants in a way that confers most of the environmental benefits such as low environmental impacts and water efficiency.

Without wasting time, we will go through a step by step program on how to make a Flood and Drain system.

Flood and drain system

Necessary Equipment and Material

Build Process

  1. Place your fish tank on a flat surface away from direct sun to reduce algae growth.
  2. Place the pump and feed pipe in the fish tank.
  3. Place the grow bed near the fish tank. Fill it with gravel and make sure it’s close to the fill pipe.  Also, make sure the drain pipe from the grow bed feeds directly into the fish tank.
  4. Install the timer on the pump and set it to cycle for 15min on, 45 min off.
  5. Join the pipes and the pump together to connect the fish tank with the grow bed. Also, remember to connect the overflow drain in the grow bed to remove water.
  6. Plant your seedlings into the grow bed and place your fish inside the fish tank.
  7. Test your fish water to determine the level of Ammonium, nitrite, and nitrate. If you notice that the pH level is high or low, you can adjust it accordingly to keep the water neutral.
  8. Turn on the pump to start the cycling process. This involves circulating nutrient-rich water from the fish tank to the grow bed then back to the tank again. After a few days, you’ll notice that your seedlings are growing; a milestone which reveals that your aquaponics system was successfully established.

Conclusion

In summary, there are tons of benefits which farmers enjoy once they set up a backyard aquaponics system. The system is cost efficient and makes backyard gardening more productive and economical. According to research, aquaponic systems use about 1/10th the amount of water used when farming on the ground. This technique helps you produce a tremendous amount of fish and vegetables within a short time in a small area.

backyard aquaponics


Energy Efficiency: 10 Way To Increase It & Save Money At Home

Every single saved cent matters these days which is why you should increase your home’s energy efficiency as much as possible. You can increase your home’s energy efficiency in many other ways – from improving your bathroom eco-friendliness to redoing home insulation – even though we are in the age of the renewable energy and economical appliances. While improving the energy efficiency of your home will not aid you in a zombie attack, it will surely make it easier on your wallet.  That means you can save up for rainy days. And by “rainy days,” we mean the zombie apocalypse!

Here is a ten tier agenda for turning your home into a modern, economical place:

1. Water-Reducing Faucets

Gallons of water are sent through old-fashioned faucets on a daily basis. A homeowner aware of this problem we have with drinking water on the global level will install faucet aerators. These devices reduce the amount of water coming from the faucet.  Reducing the water running through the faucet prevents water from being wasted and increases the pressure of its flow.

2. Modern Shower Heads

A quick shower saves more water than taking a bath. Keeping yourself clean can be even more efficient if you replace the old shower head with a new one. The new ones have a similar impact on water consumption that faucet aerators do. They reduce the number of gallons per minute consumed and increase the pressure; both of which improve the shower experience.

3. Bathroom Bulbs

The bathroom is one of the most well-lit places in every home.  This fact is especially true during the winter season. Replace your old incandescent light bulbs and install new bulbs in your bathroom to increase your home’s energy efficiency. Both CFLs and LEDs are more efficient than the old incandescents.

4. Bathroom Window(s)

Bathrooms need to have a special air-refreshing system due to their typical use. It goes without saying that every bathroom should have a vent fan for taking away unpleasant odors.  It is also very important to replace your old bathroom windows with newer, more efficient ones.  They will reduce the amount of energy wasted through the panes.

5. Mind The Fridge

The kitchen, much like the bathroom, is a huge energy consumer. It is vital to install new, Energy Star appliances.  These appliances greatly reduce the energy wasted compared to the appliances made twenty years ago. The only in-kitchen appliance that runs all the time is the fridge.  Following the guidelines to get an Energy Star-friendly fridge will decrease your overall energy costs in the kitchen.

 6. Oven Education

Most families still use the oven on a daily basis. Modern ovens have dozens of programs and options. Educating you and your family on the oven’s operation will increase your home’s energy efficiency and waste as little energy as possible. Getting to know your oven will contribute to the enterprise of cutting your home energy bills.

7. Install Ceiling Fans

Owners of smaller homes should install ceiling fans even though air conditioners are becoming more energy efficient. These type of fans consume far less energy than any kind of air conditioning unit and have the added luxury of pushing hot air down in the winter as well as cooling down rooms in the summer.

8. Improved Insulation Increases Energy Efficiency

You can invest thousands of dollars in individual energy improvements.  One of the best investments, however that you can make in your home is to properly insulate the roof and basement. Likewise, make sure that heating and plumbing pipes are properly insulated as well.

9. Layering Walls

In order to reduce the level of dampness and humidity in a home, as well as to minimize through-wall heat leaks, every homeowner should take care of exterior wall cladding. Your home will be a sealed, warm place after this step.

10. Smart Thermostat

Everything related to homes should be tech-smart and efficient these days.  Why wouldn’t your thermostats follow the same pattern? If you want to make your heating and cooling systems even more efficient, invest in a programmable thermostat. In order to take all the advantages of this device, learn how to adjust it and use it.

Energy Efficiency Conclusions

These are only some tips and strategies for cutting your energy losses. Every home is different which is why you might want to consider hiring a professional energy auditor.  They will inspect your home and provide you with all the data necessary to maximize your home’s energy efficiency.

energy efficiency


10 Uncommon SHTF Paracord Uses

I don’t know anyone involved with preparedness and survival that hasn’t heard of, seen or even purchased paracord. Be it a survival bracelet or a 100ft coil, you stow it in your Bug Out Bag for an emergency situation.

I am a strong believer that you should know HOW to use each and every single piece of gear in your pack before you need it. There is no point trying to learn on the job, so to speak. That approach could mean all of your best-laid plans fail because you didn’t invest the time upfront.

In this article, we will take a look at 10 uncommon uses for paracord. They are easy to do and I recommend you try some of them out once you’ve finished reading.

They could save your life one day.

Where To Get High-Quality Paracord?

Getting a “good deal” on survival equipment should be a secondary consideration – Quality is the primary concern. You need to be able to trust the paracord you have and you do that by buying high-quality paracord.

There are a lot of vendors out there for paracord.  I support my local shop most of the time and you should too if you have the option. If you don’t have any paracord close by, then check out Amazon for 100-foot sections at a good price.

Let’s get to the paracord projects!

Project #1 – Fishing Lure

Procuring food will be high on the agenda if you decide to bug out or when the delivery trucks stop running. Feeding yourself and your family will be a skill that every man and woman will need if they are to survive.

Fishing is one of the ‘easiest’ forms of catching food, plus it expends very few calories when compared to stalking, hunting and trapping animals for example.

Not only can paracord be used as a fishing line, but also a lure. A Lure is used to attract the attention of the fish and is a kind of Trojan horse, in that it’s designed to be something it is not and hidden in plain sight.

In the video above, you can see how she frays the ends and each strand of the cord to make it more attractive to the fish and to look like bait.

Project #2 – Fishing Line

That’s not all those small inner stands are great for, you can also make an improvised fishing rod and a line from a long piece of wood and a few meters of an inner stand that has been split down to it’s single most thread.

Combine this with the fishing lure mentioned above and you have everything you need for a spot of fly-fishing.

Project #3 – Paracord Net

During a SHTF event, a net made from paracord can be used for a number of applications, such as:

  • Gear and vehicle concealment
  • Catching fish, turtles and other food
  • Shelter roofing to add leaves and other materials
  • A hammock

The examples above a just a few ways to make use of a paracord net, watch the video below to find out how to make one from scratch.

Project #4 – Sutures

Most top-grade paracord has at least five strands, most of the time you will find seven small strands enclosed within the outer casing. These inner strands are what provide the strength to the paracord.

On their own, they are tough but fairly weak. However, combine them and you have some seriously strong stuff. The outer casing itself is weak and shouldn’t be separated from the inner strands and used to bear any weight alone.

One of the great uses in a SHTF situation is to remove one of those inner strands, which can then be split down even further to make a thread that is thin enough to thread through the eye of a needle.

If you have an open wound that needs to be closed up, you can use this to do so, whilst this is only a temporary measure, you will feel like Rambo afterward!

It is easy to make these smaller strands by taking just a single length of inner paracord strand, and twisting it between your fingers until the 2 smaller stands come away from each other. They can then be spliced apart easily.

Project #5 – Sewing and Gear Repairs

By using the same method used in the last section to create small thin strands, which have a load capacity of around 25lbs each, you can perform running repairs on your gear.

Think about it, you have a pack full to the brim, bursting with all the gear you need to survive. Now say you snag the pack on a branch and it tears open, or one of the straps breaks under the heavy load.

You can use these smaller inner strands of cord to sew your gear back together and get on with the task in hand.

Obviously this will require you to have some sewing needles in your pack or on your person, however, you can improvise by using a stick that has been sharpened to a point and simply tie the cord onto the end.

There is a downside to this however in that the holes in your gear will be larger and make the attachment points weaker.

Project #6 – Snares and Traps

I also mentioned trapping as a low-calorie expending way to catch your dinner. Setting snares and traps is a great way to spend some time when out in the wilderness in a survival situation.

You may have seen these spring-loaded traps before. In the video above, the young man uses string. Depending on the type of animal you are aiming to catch, paracord is much better suited due to its high breaking strength.

Project #7 – Replacement Boot Laces

Even if you have a bug out vehicle, the chances are you are going to have to spend some time on foot getting to your bug out location and/or protecting your home from opportunistic looting.

A good pair of sturdy tactical boots are perfect and will last a good few years if looked after. However, it’s the boost laces that often are the first point of failure I footwear.

They can get snagged, you can pull them too hard and they break. They degrade over time from the water, dirt, strain and the general wear and tear you put on them.

Paracord is a perfect replacement for your shoelaces. In fact, I swap out my laces each time I buy a new pair of boots for that very reason. It will stand up to pretty much anything you can throw at it and it can also be used for several other things such as the fishing lure I mentioned above.

Simply snip off one end to make the lure, and you still have enough lace to tie off your boots.

Project #8 – Splint, Sling, and Tourniquets

A broken finger, or any bone for that matter, in a SHTF situation is amplified by ten because of the situational requirements on you when you need your body to be fully alert and functional.

A broken finger, whilst painful, is also manageable. To aid the healing process and to prevent further damage, simply wrapping the broken finger and the finger next to it with paracord will act as a splint that will be strong and sturdy enough to provide support.

Should you be unlucky enough to break your leg, you can also use paracord and a thick branch, about the thickness of your wrist, to support the leg.

If you have a broken arm, however, you are in trouble and you need to get that arm secure and out of the way, again to prevent further damage.

By wrapping the paracord around the broken area a few times and then looping it around the neck and over your shoulder, you can have a makeshift sling.

If you have a large wound or have a member of your group who is losing a lot of blood, the first thing to apply is a tourniquet. Which, can be improvised by using a single length of paracord, tied off above the wound and then using a small stick, you twist the paracord to tighten against the leg and slow the loss of blood.

Project #9 – Bow Drill String

Making fire by friction is a skill all preppers and survivalist should possess. This is one skill that required practice and a lot of patience.

There is a great feeling of accomplishment when you complete your first friction fire. That’s not to mention the feeling of comfort and safety that comes from within, knowing you have the skill to keep making something that can keep you warm, cook your food and purify your water.

You can use paracord to make the bow section of your bow drill set, as it is strong enough to withstand the pressure exerted by the drill.

Fire, or as woodsmen call it…the outdoors TV is truly a remarkable survival tool.

Project #10 – Vehicle Hose Clamp

If you’re bugging out by vehicle and one of the clamps on the hoses in your engine fails, you can use paracord to cinch down tightly around the hose which will hold it in place until you can make a full repair when appropriate.

In fact, there are many uses for paracord with vehicles such as securing items to your roof and even to dip into the gas tank to soak up extra fuel which can then be wrapped around a stick for a torch or to help get a fire going in less than ideal conditions.

Conclusion

I hope you got a few new ideas about what you can do with paracord. It isn’t just for making colorful bracelets! You should be developing your skills with paracord all the time so when you really need them, you can work effectively under pressure. That is what survival and prepping is all about.

What is your next paracord project? Let me know in the comments below.

10 Uncommon SHTF Paracord Uses


Kitchen Composter: Inexpensive Build For Under The Sink

Winters in the Northeast are cold and snowy.  This year was extreme in both regards, even by our standards.  This kind of weather does not lend itself that well to compost pile access.  Ours was under snow for about two months and frozen solid for even longer.  We built a worm bin in order to keep the soil growing process going.  The problem we ran into was that we were creating more food waste than the worms could handle.  The solution was simple: build a kitchen composter that could hold the food in one place until the worms were ready for it.

Enter the Inexpensive Under The Sink Kitchen Composter!

Kitchen Composter Material List

You should have most of this list kicking around the house.  The only thing you’ll probably need to buy is the odor catching AC filter.

Kitchen Composter Assembly Instructions

  1. Paint the bottom of the container black.  I’d recommend a few coats to make sure no light can get in.
  2. While you’re waiting for the container paint to dry, drill a few holes in the top.  This step will allow air to flow through.  I recommend a 1/4″ diameter drill bit.
  3. Cut the No odor AC filter to fit inside the cover.
  4. Place some hot glue around the edges and and the drilled holes and press the AC filter in place.  Allow to cure.

You’re ready to go with your very own under the sink kitchen composter once everything is dry .

Here’s a short video in case you want to see what I’m talking about:

[youtube_sc url=”V12SEKPlbp8″ width=”586″]

Tips & Recommendations

We’ve been using this kitchen composter around the Suburban Steader homestead for a few weeks now and I have to say that it’s awesome.  We would previously throw our food waste in a bowl on the countertop and then have to bring it to the worm bin or compost pile almost immediately.  In the worst cases, we’d just shove it into the garbage disposal and lose all that great soil building material.

Now we can collect our food scraps over time and let it begin the decomposition stage without worry that flies or smell are going to infest our kitchen.

One suggestion I would highly recommend is lining the kitchen composter with fresh newspaper every time you use it.  As you can imagine, when food begins to decompose, it can stick to the sides of the walls making it difficult to extract later on.  The newspaper will allow you to give the bottom of the kitchen composter one or two swift hits and have everything come flying out.  The newspaper is compostable so adding it to your worm bin or compost pile is no big deal.

Another suggestion is to go with as big of a container as you can fit.  You’ll always have access to your compost pile in the warmer weather, so holding on to decomposing foods for a long time won’t be a problem.  However, when your compost pile is covered in snow, you’re going to be at the mercy of your worms and how fast they can eat and decompose your food scraps.  Having a bigger container allows you to hold more food between feedings and not overwhelm you worm bin.  And we all know the stink and mess an overwhelmed worm bin can cause.

Under The Sink Kitchen Composter

How did your Under The Sink Kitchen Composter come out?  Be sure to share pictures on Facebook!


Custom Made Bullet Casing Earbuds

Looking for that last-minute present for that person on your list who seems to have everything?  Why not make them a gift instead?  I present you with the Custom Made Bullet Casing Earbuds.

Now, before you begin to think of me as a genius, I have to confess that I saw this idea on YouTube.  It is the creation of the folks (or folk) over at Inspire To Make.  They have a really cool site and YouTube channel – I highly suggest you check them out.  I spent an entire afternoon going down the rabbit hole that is their YouTube channel and was inspired to begin creating!

And remember, suburban homesteading is about being able to do more with less – or different – material.  So, while building custom-made earbuds is not a purely homesteading activity, think of them as a way to improve your DIY skills and also as a way of building your creativity.

Custom Made Bullet Casing Earbuds Material

These earbuds are actually rather simple to make, material wise.  The short list of material is as follows:

  • (2) .40 cal Bullet Casings
  • TDK Life on Record Headphones
  • 400 Grit Sandpaper
  • 800 Grit Sandpaper
  • 3M Superfine Finishing Pad

In addition, you’ll need a few tools including:

  • Cordless Drill
  • Hacksaw
  • 10mm Diameter Wooden Dowel
  • Soldering Iron
  • Vice

Here’s a one-stop shopping list from Amazon.com for your convenience:

How To Make Bullet Casing Earbuds

Rather than describe the process, I suggest you watch the video and check out the website:

[youtube_sc url=”gJOKCtVwI1E” width=”550″]

Why Make Bullet Casing Earbuds?

You mean other than the cool factor?  There’s really a few reasons:

  1. They’re cool! Yeah, we’ve beat that one to death
  2. Whoever you’re giving them to will have a one of kind item
  3. You’ll improve your DIY skills
  4. You’ll be inspired to create more

Reasons 3 and 4 are the true reasons I recommend this project.  Would you have thought to make earbuds from spent casings before seeing this project?  I didn’t.  Now I’m thinking about all kinds of different things I can do with material to make cool, one-off items.

Increase your DIY skills today and make a great gift in the process!  Let us know how they came out!

Bullet Casing Earbuds

Custom Made Bullet Casing Earbuds


DIY Battery Storage Cabinet

Successful suburban homesteading hinges on your ability to quickly solve problems.  More often than not, those problems involve fixing or replacing something.  On a more remote homestead, this may mean big projects like fixing broken fences, solving leaky roofs and clearing large lots of lands.  In the suburbs, the day-to-day problems are typically a bit more benign.  And the tools that suburban ‘steaders use tend to be less bulky and many times run on batteries.  That being the case, not being able to replace your batteries quickly because you can’t find any can be a big problem.  Enter the solution to your problem: the Battery Storage Cabinet!

Required Material

Full disclosure, I found this project on WoodMagazine.com via The Survival Sherpa’s Facebook Page.

This project is rather simple (and cheap) to do.  Here’s all the material I used, where I bought it, and how much it cost:

  • 2.5″ x 0.5″ x 8′ Pine Boards (2 x $4.37 at Home Depot)
  • 1/4″ x 2′ x 4′ MDF Panel (1 x $6.27 at Home Depot)
  • 1/8″ x 18″ x 36″ Clear Acrylic Sheet (1 x $19.93 at Home Depot)
  • #8 FH Wood Screws, 1/2″ Long (1 pkg of 100, $8.66 at Home Depot)
  • Total Material Cost: $43.60

While the total material cost was $43.60, I am able to use the left over MDF, Acrylic and wood screws for other projects.  That brings the total material cost (material consumed) down to $15.06. The only material cost I’m not showing is the nails I used to put the pieces together.  I had a large quantity on-hand so they were “free” to me on this project.

Required Tools

I, personally, am the kind of person who prefers to use the right tool for the job.  Because of that, I used a good number of different tools to get this project done.  You can follow my lead or use simple tools like a handsaw, hammer, nails and screw driver.  If, however, you’d like to speed up the process, here’s what I used:

Again, you don’t need all these tools to make the Battery Storage Cabinet, but they sure do help!

Battery Storage Cabinet Assembly Instruction

As they say, a picture is worth a thousand words.  To help assist you in assembly of the Battery Storage Cabinet, I have provided a PDF document below that shows how the pieces go together and the dimensions of all the individual pieces.  A bit of advice – take the time to review the document and cut the pieces as close to exact as possible.  It will help during the final fit-up and assembly.

DIY Battery Storage Cabinet

Click To Download Build Plans!

Final Thoughts

The Battery Storage Cabinet is a great organizational tool for the homesteader.  It allows you to easily organize your batteries and quickly take inventory of where you are lacking in inventory.  On top of that, it’s a great project to do on a weekend day.  I was even able to get one of my kids involved (see below) which made this project all the more fun to do!

DIY Battery Storage Cabinet Helper

My little helper measuring out our next cut!

If you have any questions about this project, please feel free to leave a comment here or on Facebook!

DIY Battery Storage Cabinet Helper


Hike Recon: How To Prep For Your Next Hike

If you were ever in Boy Scouts or Girl Scouts, you are familiar with the “Be Prepared” motto. It’s a good concept to follow throughout all aspects of life. One of the most important places to be prepared is when you’re heading out into the wilderness, away from the conveniences of civilization. Whether you’re heading on a day hike, Appalachian Trail thru-hike or a camping trip, it’s important to have done reconnaissance (recon) for the area you’re heading into.

Hike Recon: Why Should I?

A lot of people I meet tell me that, when the mood strikes, they’ll grab a pack and head out for a hike. And, in most cases, that approach doesn’t present too many problems. Usually these people are going on a (short) day hike close to home on a trail they’ve most likely already hiked. Performing hike recon really isn’t something they think about in this scenario.

Hike recon is more important when you’re heading a decent distance from home and plan on hiking in an area you’ve never been to previously. For instance, I’m planning on hiking Bear Mountain in upstate New York with a few coworkers. We all live on Long Island, NY and none of us have ever hiked there. Hike recon is important to us for a few reasons:

  • Understand the terrain we’re entering
  • Determine a hiking route
  • Understand equipment requirements of the area (crampons, ice axes, additional water, etc.)
  • Acquire driving directions (multiple routes)
  • Determine post-hike locations (restaurants, restrooms, gas stations, etc.)

Initial Hike Recon: Google It!

For your initial hike recon, Google is your friend. You can use it to search for all kind of information – maps, hike reviews, driving direction, expected trip duration, driving directions, etc. To start this process, try typing in {hiking location} hiking. When we typed in Bear Mountain Hiking, the following results appeared:

Hike Recon: Bear Mountain Google Search

This search provides you with a wealth of information. Right away, you can click on the link to the right and get directions. By manipulating Google Maps, you can create multiple driving routes and print them out.  In addition to the Google Maps link, there are also links to the NYS Park Department, specifically the page associated with Bear Mountain.  You can find links to trail reviews, places to buy maps, and general information about the State Park.  Just about everything you need is here.

Google Maps also gives you the opportunity to see a topography map of the area.  If you’re not familiar with the term, a topography gives you a feel for the elevation terrain of an area.  Contour rings on the map designate changes in elevation and, by studying these maps, you can get a good feel for how the terrain changes in that particular area.  All you have to do to get a topographic map is click the map ‘box’ (the one to the right at the top of the screen) and a pulldown menu will appear.  Click Terrain and you’ll be provided with a topographic map.

Organization Methods

All this information is great, but you need to organize it.  I prefer to use Evernote for this kind of data collection.  It allows me to clip information from webpages, upload pictures and PDF files and generally keep everything for a particular hike organized in one spot.  It also syncs to the cloud so I can share the information with my buddies.

This slideshow requires JavaScript.


Other Resource For Hike Recon

While Google and Google Maps gets you 90% of the way to a full recon, there are a variety of other ways to gather information on a new hiking location.

Google Earth

Google Earth is a great tool to get a better feel for the contour of the land.  You can download the application for free and use it to ‘explore’ the surrounding area of interest.  The views provided by Google Earth, as well as the topographic maps from Google Maps, should provide you with sufficient information to make a determination on the type of elevation change the area you’re going to hike in will have.  Google Earth is also good for determining mid-hike destination points.  Users have provided pictures that are geotagged to certain locations.  You can use these pictures to see if a certain spot interests you and plan your hike accordingly.

Social Hiking Websites

I typically visit Trails.com and AllTrails.com before a hike.  Each one of these sites is a mix between a mapping site and a social site.  Users typically download an app (both paid and free) to their smart phone and track their hikes.  They can then provide feedback on the trails, key views not to miss or areas of concern (loose rock, muddy in the spring, etc.) that you may want to avoid.  While I’ve used them in the past, I don’t track my hikes that much anymore on the apps.  I simply don’t find that I get too much out of it.  The sites, however, are a wealth of information especially when you are visiting a new area.  Finding websites for local hiking clubs are also very valuable as these folks tend to hike the trail often (it’s in the their backyard) and are full of tips suggestions for hiking in that area.

Local and State Park Website

It goes without saying that, if you’re hiking in a local municipality park or a state park, you need to follow the rules for that park.  The websites for these parks will provide you with information such as:

  • Parking information – location, fees, access to trails
  • User Information – some parks charge to hike or require a permit for certain trails
  • Driving directions
  • Local attractions
  • Where to purchase trail maps

Weather Related Websites

Weather.com is my first stop as the trip nears for weather reports.  They typically provide reports geared towards outdoor activities and, in my experience, are more accurate than some of the other sites.  You, of course, are free to use the site of your choice.  I also go to websites that provide historical weather.  AnyPlaceAmerica.com is a pretty good choice since it’s a one stop shop for historical weather data and printable topographic maps.

Hike Recon Wrap-Up

While it’s an important step, performing hike recon is a fairly easy process.  The internet, specifically Google (searches, Maps and Earth), are full of interesting information.  In addition, local and state agencies are more than willing to provide information you need – sometimes at a cost.  The most important thing you can do when you are performing reconnaissance for your hike is over-inform yourself.  Too much information is always safer than not enough information.

We’d love to hear your tips and tricks for performing hike recon.  Let us know in the comments or on Facebook!

photo credit: Calsidyrose via photopin cc

Hike Recon