1

Pallet Projects For Suburban Homesteaders

I recently bought a brand-new house in the suburbs of Boise, Idaho. One of the best things about the suburbs is the ease of access to places with pallets, which you can get for free or for just a few dollars. Here’s a great guide for how to pick a suitable pallet and to tell whether they are heat or chemically treated. Disassembling is quite easy, providing the raw materials for projects.

First, an important note: Be sure to clean and sanitize the wood no matter whether you have reclaimed wood in the form of a pallet, a local seller, or from your own tree.  It could carry germs into your house. Cleaning will also help eliminate potential slivers. Once done and dried, you are ready to start your projects.

Pallet Projects

1. Love Seat

Although the instructions for this love seat call for plywood, pallet boards work just as well. Cut a template for the seat portion.  Make sure it will be a comfortable seat by comparing the curves to a couch. Then, seal and stain the wood.  Finally, glue or nail everything together. This piece goes perfect with a garden – but we’ll get to garden projects later.

2. Patio Couch

Have room on your patio for more than just a love seat? Upgrade to a full L-shaped couch. The majority of this project is cutting pieces to size to hide the fact that the base is a pallet. Add armrests and pillows, and enjoy the great outdoors.

3. Hanging Bed

Looking for the perfect place to sip lemonade and read a book on the weekend after gardening? If you have a sturdy tree, there’s nothing better than a pallet swing bed. The best part is that screwing together two pallets to make the bed and adding pallets for a backrest is half the project. Strap some rope to the four corners and hang it up. Just make sure the bed is level.

4. Headboard

Speaking of beds, a pallet headboard carries the pallet theme inside while being stylish. Once again, this is as simple as measuring how big you want the headboard, ripping the pallets apart, and nailing the pieces together. Stain or paint to your tastes.

5. Garden Planter

If you are on this site and don’t have a garden, it’s time to change that. Making your own planter from wood is already cheap and an afternoon’s leisurely work. Pallets, however, drive the cost down that much more. To give a planter the pallet look, leave gaps in between boards. As with the strawberry planter at the link, you can let bark and the plant fill in the gaps, or use planter lining. Feeling even lazier? Set a pallet upright, line the crossbars with planter lining, fill with dirt, and call it a vertical garden. Bonus points for planting edible flowers for not only practical but aesthetic purposes.
planting pallet
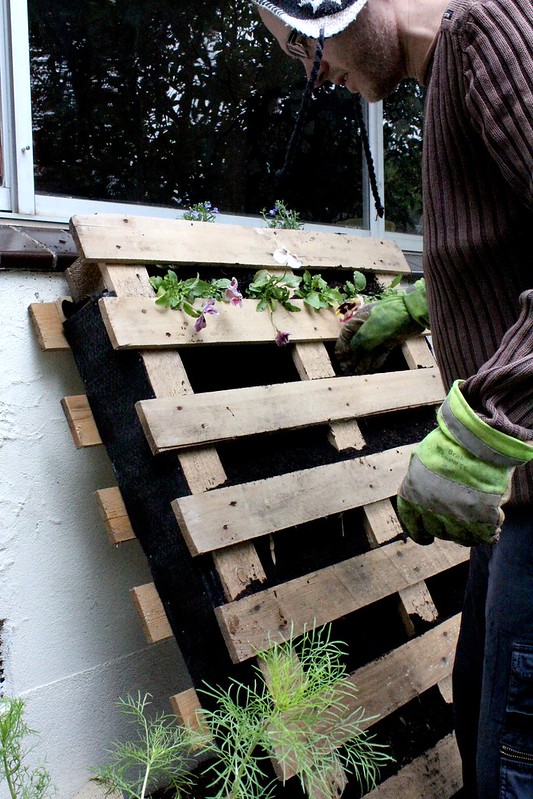
Source: Flickr user various brennemans (CC BY-SA 2.0)

6. Dog Bed Frame

Man’s best friend needs a place to sleep outside, too. A dog bed frame for a cushion and some blankets will ensure your pooch can hang around outside in comfort with you – especially if you are lounging on one of the earlier projects.

7. Shelving

Outside, pallet shelving can be used to store tools or toys. Inside, they fit nicely in a pantry, ready to hold canned goods. For inside shelves, all you need is an appropriate stain and possibly sealant, especially if the shelves will hold food. Outdoor shelves need to have weather-resistant sealant at the least, to prevent rot and damage. 

8. Shed

This idea, without a doubt, is the most involved project. It’s also extremely practical and can fit some of the previous projects inside. Behold: The pallet shed. Buying all the wood for a shed would be expensive. But pallet wood is anything but costly, leaving plenty of money for cinder blocks for a base, nails and screws, mortar, shingles, hardware to mount a door, and glass for windows. The original builder made a 20’x8’ shed for about $500. A shed from Home Depot will cost double that for half the space.

Conclusion

Overall, pallet projects are fairly easy ways to get into the DIY world.  A good suburban homesteading has certain skills that set him or her apart from the pack.  Being able to improvise and create solutions with their own hands is one of those.  These eight projects will get you moving in the right direction!

Pallet Projects For Suburban Homesteaders


6 Skills Every Suburban Homesteader Needs

Suburban homesteader.  What comes to mind when you hear that term?  Personally, I think of person who lives in the typical American suburbs, they’re probably married with a few kids.  Maybe a dog.  Their land isn’t huge, but it’s being transformed into something that’s functional and they’re very proud of that fact.  The household quite possibly runs on two incomes and free-time is scarce commodity given all the social obligations they have.  Does this description sound like you?  Even if there are a few differences with your situation, you can relate to it, right?  Then you’re a suburban homesteader.

We’ve identified you as a suburban homesteader.  Awesome!  But what now?  What do you need to do to make this life work?  Well, as luck would have it, I’ve laid out six skills you need to improve your abilities and become the suburban homesteader you always wanted to be:

1. Monthly Financial Tracking

I’ve spoken before about how important financial independence is to the suburban homesteader.  Those guidelines still hold true.  I want to see you free from the shackles of debt.  Even more so, I want you to track your finances and know what your incomes and expenses are.  Treating your suburban homestead like a business by looking at the financials of your home every month will easily let you see the areas that are going to become problems before they do.  Are you spending too much money on dining out? Has your income dipped in the last few months? Are you spending more on a certain area of life than you were before? Why?

All these answers are answered in the monthly financial review.  Suburban homesteaders typically are folks who rely on two incomes and have a vast array of family activities in addition to the homestead which makes it easier to fall into debt.  Keeping track of your finances on a monthly basis will help you keep your debt from rising and allow you to track the costs of all these activities.

2. Gardening

Most people think of gardens or farms when they hear the word homesteading.  You more than likely will not have room for a farm in suburban homesteading so you need to concentrate on gardening.  The simple act of starting a garden can do so many things for you.  First and foremost, you will provide food for your family at reduced cost to what you would pay at the supermarket.  Second, the food you will be providing will be fresher and healthier than what you are buying.  Even if you buy GMO-free organic vegetables and fruits, they will not taste as fresh and vibrant as something you pull out of the ground or harvest moments before eating.  Third, and probably most important, you’ll be developing a functional skill that will make you more self-sufficient.  And, to top it all off, gardening is a great family activity that everyone can take part in.

Get your garden going today!

3. Composting

The ability to produce your own compost is paramount to a healthy garden.  Your soil’s health is an investment in your garden and, in turn, an investment in your family’s health.  And, truth be told, composting is not that hard.  Take your table scraps, yard waste and whatever other organic matter you can find and throw it in a pile.  Keep turning it every so often as you continue to add to it.  Before long, you’ll have thick, dark compost that your vegetables will love you for.  We have been feeding our compost pile here on the Suburban Steader Homestead for about a year and we probably have 2-3 cubic yards of compost at this point.  It can be done and is easy to do.  Don’t worry about perfecting the balance of greens and browns.  Just go at it and you’ll learn what works best!

4. Handyman Capability

By definition, you live in the suburbs if you’re a suburban homesteader.  And that means ‘fix-it’ folks are very prevalent.  Plumbers, electricians, contractors, gardeners, mechanics and appliance repairmen are all willing to take your hard-earned money.  Most of these folks are quite skilled at what they do and will probably do the job quicker than you.  But, will they do it better than you?  The answer is probably not.  You can can find out how to fix just about anything on YouTube if you’re willing to spend a little time learning.  You might need some new tools and extra material for when you mess up the first time, but you can develop yourself into a pretty proficient handyman if you want to.

I don’t want you to get me wrong here – being the son of a plumber, I can absolutely tell you there are times when you should call in the professionals.  But most of the fixes around your house can be completed with a little learning, trial, failure and elbow grease.  There’s so many benefits to improving your handyman skills: saving money, developing a talent and having the confidence to know that you can conquer almost any problem your home throws at you!

5. Project Management Skills

I can already hear the groans on this one.  First, I want you to stop thinking about the folks at work who are running around with Gantt charts and work breakdown structures (FYI, I am a project manager at work, so I am one of those people).  When I talk about project management skills around the suburban homestead, I’m talking more about thinking through a project and trying to corral it a bit before jumping in full force.  Let’s take for instance a fairly small project of building a garden box.  The project management skills you’d want to use here include the following:

  1. Material Cost Estimate: Think about all the materials you’re going to use including wood, fasteners, fill material (soil, compost, etc) and any new tools you need for the job.  Can you afford this project right now (go back to the first skill we talked about)?
  2. Project Duration Estimate: Is this a project you can finish on a Saturday?  Is it a two-day job?  With that information, you can then look at your calendar and figure out when a good time to start it would be.  Maybe your kids have a soccer tournament this weekend, but you’re free next weekend.  Plan accordingly.
  3. What’s My Return On Investment (ROI)?: Why are you building this garden box? Do you need the extra space? Is the money your going to spend on it, not to mention your time, going to be compensated by the final product?

None of these things are terribly difficult to think about but it’s important that the suburban homesteader (you!) is spending their time and money as wisely as possible.

Oh, and just so you know, I have used a Gantt chart for projects around the house ranging from remodelling to cooking Thanksgiving dinner – and they all went off flawlessly.  So, maybe it isn’t a bad skill to work on as well…

6. Determination and Self-Motivation

These are the least tangible but, arguably, most important skills a suburban homesteader needs to succeed.  The reality of life on a suburban homestead is that things are not going to always follow plan.  Money is going to get tight at times, the family pet is going to get sick, Johnny or Jane is going to break their arm, Mom or Dad is going to get sick, the boiler is going to bust, etc.  Life is going to happen.  Having a determination and self-motivation to keep going despite these setbacks is the most important skill a suburban homesteader can develop for success. So, to invoke a few over-played clichés, keep your head up and keep your eyes on the prize.  Know what your goal is and shoot higher.  You’re bound to flounder a bit, but by aiming higher you’ll increase your odds or achieving all that you wanted to achieve.

Become The Suburban Homesteader You Always Wanted To Be

So there you have it – 6 skills every suburban homesteader needs to succeed at this game.  Financial tracking, gardening, composting, handyman skills, project management, determination and self-motivation.  You’ll be a better suburban homesteader and a better person if you spend the time to develop and hone these skills .

6 Skills Every Suburban Homesteader Needs


Custom Made Bullet Casing Earbuds

Looking for that last-minute present for that person on your list who seems to have everything?  Why not make them a gift instead?  I present you with the Custom Made Bullet Casing Earbuds.

Now, before you begin to think of me as a genius, I have to confess that I saw this idea on YouTube.  It is the creation of the folks (or folk) over at Inspire To Make.  They have a really cool site and YouTube channel – I highly suggest you check them out.  I spent an entire afternoon going down the rabbit hole that is their YouTube channel and was inspired to begin creating!

And remember, suburban homesteading is about being able to do more with less – or different – material.  So, while building custom-made earbuds is not a purely homesteading activity, think of them as a way to improve your DIY skills and also as a way of building your creativity.

Custom Made Bullet Casing Earbuds Material

These earbuds are actually rather simple to make, material wise.  The short list of material is as follows:

  • (2) .40 cal Bullet Casings
  • TDK Life on Record Headphones
  • 400 Grit Sandpaper
  • 800 Grit Sandpaper
  • 3M Superfine Finishing Pad

In addition, you’ll need a few tools including:

  • Cordless Drill
  • Hacksaw
  • 10mm Diameter Wooden Dowel
  • Soldering Iron
  • Vice

Here’s a one-stop shopping list from Amazon.com for your convenience:

How To Make Bullet Casing Earbuds

Rather than describe the process, I suggest you watch the video and check out the website:

[youtube_sc url=”gJOKCtVwI1E” width=”550″]

Why Make Bullet Casing Earbuds?

You mean other than the cool factor?  There’s really a few reasons:

  1. They’re cool! Yeah, we’ve beat that one to death
  2. Whoever you’re giving them to will have a one of kind item
  3. You’ll improve your DIY skills
  4. You’ll be inspired to create more

Reasons 3 and 4 are the true reasons I recommend this project.  Would you have thought to make earbuds from spent casings before seeing this project?  I didn’t.  Now I’m thinking about all kinds of different things I can do with material to make cool, one-off items.

Increase your DIY skills today and make a great gift in the process!  Let us know how they came out!

Bullet Casing Earbuds

Custom Made Bullet Casing Earbuds


How To Build A Worm Bin

How would you describe the typical suburban homesteader family?  More than likely you’re looking at two parents, a few kids, maybe a dog or a cat, two full-time jobs, soccer practice, ballet recitals…the works!  With that kind of schedule, how are you going to fit in managing livestock on your suburban homestead?  I’ve got the answer for you – worms!  And to raise worms, you’re gonna need a worm bed!

In today’s post, we’re going to explain why you’d want to raise worms and how to build a worm bin.  This information is very similar to what you’d find in Anna Hess’ great book entitled The Weekend Homesteader.  If you don’t already have a copy, I highly recommend you pick one up.  Every suburban homesteader should have one!

Why Worms?

Raising worms is all about the quality of the finished product, not necessarily the quantity.  Anna Hess explains it best:

…your worm bin isn’t going to produce gobs of compost…an under-the-sink worm bin will churn out enough nutrients for a potted lemon tree

But, remember that, despite how much (or little) you get in terms of worm output, the quality is super high.  Worm casting a very high in micronutrients and will help your food grow better than just about any other compost available.

Remember that commercial that used to say “A little dab’ll do ya”?  Well, that’s worm castings and tea in a nutshell.  Adding a small amount will show tremendous results to your garden.  That fact alone makes growing worms a worthwhile endeavor for the suburban homesteader.

Gathering Your Supplies

There’s nothing particular outrageous required to make a worm bin.  You’ll need the following:

Plastic Storage Bins

The Plastic Storage bins should be somewhere in the 8-10 gallon range and can usually be found for around $5 a piece.  Make sure both of the ones you are using are the same size.

Sheet of Cardboard

The sheet of cardboard needs to be big enough to cover the top of one of the bins.

Bedding

Worms love shredded newspaper for bedding.  If you have a shredder that creates strips, you’re all set.  The cross-shredders cut the paper into pieces that are too small.  In the absence of shredded newspaper, you can use hand-shredded paper, torn-up cardboard or egg cartons, fallen leaves, straw, coconut coir and peat moss.  Each of these have their downfalls, mostly that they’ll mat down in the bin too much when they get wet.

Worms

Let me say this very simple – we’re not raising earthworms.  Compost worms are known as red wrigglers, redworms or Eisenia fetida.  You might be able to find these guys living in horse manure, but you’re more than likely going to have to purchase them.  You can find some on Amazon.com or at Vermicomposters.com.  You’ll want about 2 lbs of worms for your bin, but could start with 1 lbs and let them grow to fill the space.

Soil

Nothing special here – a few scoops from your garden thrown into the bin to help the worms grind up their food.

Making The Worm Bin

This process is incredibly easy and even those of you who are mechanically challenged can do this project.  Here we go:

  1. Soak your bedding in water for a few hours.  It needs to be soaked, but not dripping.
  2. While the bedding is soaking, use the drill and drill bit to put about 10 holes in the cover and about 8-10 holes in each wall of one of the containers.  The bottom of the container should have about 20 holes.  You can use the ruler and marker, like I would, to put the holes in a nice, equally space pattern or simply do it by eye.  Either way, you want a fairly even distribution of holes across each face.
  3. Place the bin with the holes inside the bin without any holes.
  4. Place the saturated bedding in the bin with the holes and add your soil.  Mix well.
  5. Use the scissors to cut the cardboard so it sits flush with the top of the bedding.  This addition will keep the worms dark and moist.
  6. Pour the worms in (including any bedding they came with) and replace the cardboard.
  7. Place the plastic lid on top and your done!

Caring For Your Worms

Much like any livestock, worms do take a little bit of work to care for.  But, unlike most livestock, they’re not going to require daily attention.

Feeding

You’ll want to let the worms settle for a few days after you finish building the worm bin.  At that point, you can add food scraps on a schedule that works for you – daily, weekly, whatever.  Just make sure you are placing the scraps in different areas of the bin to promote the worms moving around.  You can feed them just about anything you eat, although you’ll want to avoid citrus peels, bread, meat and oil.  Citrus can be toxic in larger quantities.  Likewise, bread, meat and oil will increase your chances of a pungent smell.  Make sure you add a handful of fresh bedding eat time you feed them to cover up the scraps and keep the chance of smell and fruit flies down.

Overfeeding

Overfeeding is the biggest cause of worm bin failure.  On a daily basis, a pound of worms can process roughly one-half pound of food scraps.  That means your two-pound of worms can handle about seven pounds of food scraps per week.  Anything above that should make its way to your compost pile.  You do have a compost pile, right?

Bedding

The only care you need to give your worms besides feeding them is keeping their bedding moist, but not sopping wet.  Likewise, you might find your bin is too dry.  Either way, the way to tell something is wrong in your worm bin is to see how many worms are escaping to the lower bin.  A few worms showing up there every week is normal.  Anything more than that and you’ll need to investigate your worm bin’s conditions and see if you need to add moisture or dry bedding to reduce moisture.

As mentioned previously, stink and fruit flies can also be a problem.  But, in the end, almost every worm bin problem can be treated by adding new layers of bedding (moist or dry, depending on your problem) and never having food scraps above the bedding.  Reducing or stopping feeding for a few weeks during this process also helps.

Harvesting Tea and Castings

Harvesting worm bin tea is super easy.  Simply remove the inner container and pour the worm bin tea from the outer container into a third container.  Replace the inner container and you’re done.  Now you can apply the worm bin tea to your favorite plants for a quick boost of fertilizer.

It’s time to harvest the castings when the contents of the inner container begin to look more like compost and less like bedding and food scraps.  Get a third container, drill holes in it like described above, place some fresh bedding and food scraps in it and then place this new container on top of the original inner container.  Place the cardboard and lid on top of this new, third container.  The worms will work their way into the new bin over a week or two.

When applying the casting to your garden, remember the following:

  • Your soil should be made of no more than 20% castings
  • Casting are best used in your vegetable garden
  • Castings should be used when fresh and damp

Conclusion

Building a worm bin is an easy task that will result in big returns on your suburban homestead.  You’ll have a recycling center right in your house, as well as a compost creator and a fertilization machine.  Your return on investment is terrific with this project so get after it!

Let us know in the comments how this worked out for you!


How To Build A Worm Bin

photo credit: AxsDeny via photopin cc

How To Build A Worm Bin


DIY Battery Storage Cabinet

Successful suburban homesteading hinges on your ability to quickly solve problems.  More often than not, those problems involve fixing or replacing something.  On a more remote homestead, this may mean big projects like fixing broken fences, solving leaky roofs and clearing large lots of lands.  In the suburbs, the day-to-day problems are typically a bit more benign.  And the tools that suburban ‘steaders use tend to be less bulky and many times run on batteries.  That being the case, not being able to replace your batteries quickly because you can’t find any can be a big problem.  Enter the solution to your problem: the Battery Storage Cabinet!

Required Material

Full disclosure, I found this project on WoodMagazine.com via The Survival Sherpa’s Facebook Page.

This project is rather simple (and cheap) to do.  Here’s all the material I used, where I bought it, and how much it cost:

  • 2.5″ x 0.5″ x 8′ Pine Boards (2 x $4.37 at Home Depot)
  • 1/4″ x 2′ x 4′ MDF Panel (1 x $6.27 at Home Depot)
  • 1/8″ x 18″ x 36″ Clear Acrylic Sheet (1 x $19.93 at Home Depot)
  • #8 FH Wood Screws, 1/2″ Long (1 pkg of 100, $8.66 at Home Depot)
  • Total Material Cost: $43.60

While the total material cost was $43.60, I am able to use the left over MDF, Acrylic and wood screws for other projects.  That brings the total material cost (material consumed) down to $15.06. The only material cost I’m not showing is the nails I used to put the pieces together.  I had a large quantity on-hand so they were “free” to me on this project.

Required Tools

I, personally, am the kind of person who prefers to use the right tool for the job.  Because of that, I used a good number of different tools to get this project done.  You can follow my lead or use simple tools like a handsaw, hammer, nails and screw driver.  If, however, you’d like to speed up the process, here’s what I used:

Again, you don’t need all these tools to make the Battery Storage Cabinet, but they sure do help!

Battery Storage Cabinet Assembly Instruction

As they say, a picture is worth a thousand words.  To help assist you in assembly of the Battery Storage Cabinet, I have provided a PDF document below that shows how the pieces go together and the dimensions of all the individual pieces.  A bit of advice – take the time to review the document and cut the pieces as close to exact as possible.  It will help during the final fit-up and assembly.

DIY Battery Storage Cabinet

Click To Download Build Plans!

Final Thoughts

The Battery Storage Cabinet is a great organizational tool for the homesteader.  It allows you to easily organize your batteries and quickly take inventory of where you are lacking in inventory.  On top of that, it’s a great project to do on a weekend day.  I was even able to get one of my kids involved (see below) which made this project all the more fun to do!

DIY Battery Storage Cabinet Helper

My little helper measuring out our next cut!

If you have any questions about this project, please feel free to leave a comment here or on Facebook!

DIY Battery Storage Cabinet Helper