1

Prepping 101: Building a Black Out Box

Looking for a fun project to do with the kids which will add to your preps and is probably something you haven’t thought about doing yet?  Build a Black Out Box!

What’s a Black Out Box you ask?

Simply put, a Black Out Box is a small container which houses items that will allow you to get setup if and when the power goes out.  Build one today!

Why Should I Build A Black Out Box?

We all know that being set-up for different scenarios is what makes us (preppers, survivalists, whatever your name du jour is) different from the rest of the world.  We stock away food, clothes, equipment, firearms, ammunition, seeds, tools and just about anything else we might need with the world goes south.

Obviously, it’s great that we are prepared for anything that might happen.  And here at the Suburban Steader homestead we prepare for situations which you can picture as expanding circles with the most complex disasters being at the outside and the simplest situations being at the center.  If a complete SHTF event is the outer circle, a power outage is one of the most inner circles.  So, while you have your Bug Out Bag all prepped for when you have to ditch out, you also need a Black Out Box for those most common instances where the power is out for any kind of duration.

The Black Out Box consists of items which allow you to navigate your house and begin acting on further protocols, depending on the situation.  Think of the two following situations:

Situation #1: Simple Power Outage

It’s a weekday night during the spring or summer and you’re in the process of putting the kids to bed.  The weather is warm, but daylight is gone.  All of a sudden, you hear the screech of locked up tires and a big crash.  Someone has run into a telephone pole at the end of the street and knocked out power to your neighborhood.  The crash aside, it’s not a major catastrophe, although you will be out of power for at least a few hours.  What are you going to do?

If you have a Black Out Box, you know right where to go to grab a flashlight and a few candles.  These items will light up your house enough to get the kids in bed.  Maybe you and your spouse enjoy a glass of wine against some candlelight afterwards – not such a bad way to spend an evening.

Situation #2: Major Storm Hits

It’s the middle of a winter night and a blizzard dumps over three feet of snow in your neighborhood.  In addition, the storm turned into an ice storm which but inordinate amounts of weight on the power lines and caused a power outage in most of the county.  Power will be out for days due to emergency personnel having trouble accessing neighborhoods.

You, being the prepared individual you are, go straight for your Black Out Box.  The equipment in the kit allows you to navigate the house and get prepared for the longer duration.  You’ll have light to get to your generator and whatever other preps you need to implement.

How To Build A Black Out Box

The good news is that building a Black Out Box does not cost a lot of money.  But, before we get into cost, let’s talk about what’s in a Black Out Box.  As we’ve mentioned, the main purpose of Black Out Box is to allow for quick access to light when the power goes out.  So, as you might imagine, we suggest the following items for a Black Out Box:

  • Flashlights (with spare batteries)
  • Headlamps (with spare batteries)
  • Candles (with matches and/or lighters)
  • Glow Sticks
  • Fire Starting Material (if you have a fireplace or wood stove)

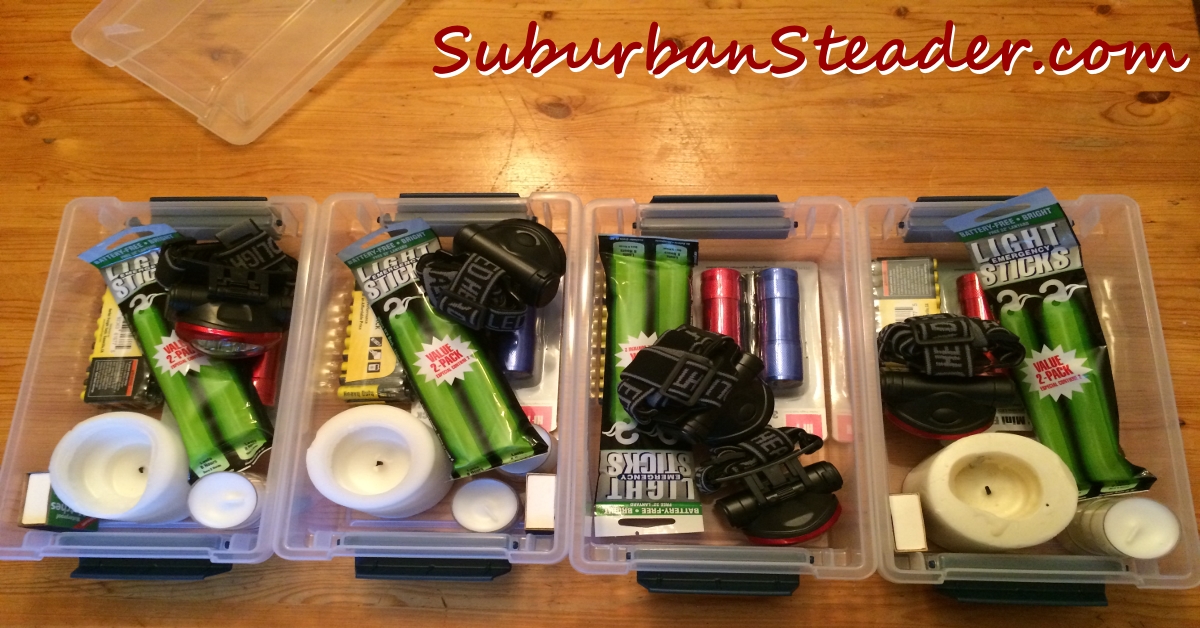
I’m willing to bet that you have most, if not all of these items around the house.  If not, you can pick them up quite inexpensively at local shops.  For instance, I was able to put together the kits shown below for less than $20:

  • Storage Tub w/Lid – $2.99 (Target)
  • (2) 3.5″ LED Flashlights – $2.99 (Harbor Freight)
  • Headlamp – $4.97 (CostCo)
  • AAA Batteries – $4.99 (Harbor Freight)
  • Light Sticks – $1.97 (Home Depot)
  • (4) Tea Lights – $1.00 (Target)

I want to caveat this Black Out Box kit with the statement that we put ours together as an exercise in cost.  I would recommend sticking with higher quality equipment.  I’ve put together a list of Black Out Box equipment you might want to consider purchasing below:

Suburban Steader Black Out Box

Where To Put Black Out Boxes

We built four Black Out Boxes and placed them in strategic positions all around the house.  Remember that you’ll most likely not know when the power is going to go out and will need quick access to the Black Out Box.  With that thought in mind, we recommend these suggestions:

  • Have a Black Out Box on each level of your house
  • Have a Black Out Box in each bedroom
  • Have a Black Out Box in each room that is regularly used

With these guidelines in mind, we placed our Black Out Boxes in the following locations:

  • Our Bedroom
  • The Kids’ Bedroom
  • Under the sink in the Kitchen
  • In the entertainment center in the Den

Each of these areas of our house has heavy traffic and provides locations which are easily accessible.  Even more important, these are the rooms someone will most likely be in when the power goes out.

Wrap-Up

There you have it – the how’s and why’s of building a Black Out Box.  I strongly you recommend building a few of these and stashing them around the house.

My kids really enjoyed putting these together with me – they even enjoyed going to the store to pick out the items we put in them.

Let me know in the comments if you have any questions and post pictures of your Black Out Boxes on our Facebook Page!

Black Out Box

Prepping 101: Building a Black Out Box


Prepping 101: Financial Independence

I want to let you in on a dirty little secret about prepping: it ain’t cheap!

Once you get through your “Oh, crap!” moment, you’re going to do the same thing I did. You’ll realize that there’s a whole lot of action you need to take and a fair amount of things you need to acquire. A lot of these actions and acquisitions require money – money you might not have right now. So, what are you going to do to get started?

Go into debt?

Buy it on credit cards?

WRONG!

You’re going to do the first thing I did – sit down and make a plan to get out of debt. If you do nothing else described in this series, you’ll benefit immensely just by getting out of debt and creating financial independence for your family. Not being handcuffed by the credit card companies and banks will make you breath easier and sleep sounder.

Why My Finances?

Your first thought might be “why should I get my checkbook in shape before I stock up on beans, bullets or band-aids?” The answer is simple: without a solid financial backing, you can’t buy anything. Putting yourself into debt just to ‘be prepared’ is detrimental to your cause. You can have all the food store, medical supplies and firearms you can handle, but you’ll be up a creek without a paddle if spend all your money on preps and can’t afford to pay your mortgage or rent.

Where To Start

The first thing I recommend doing to start getting your finances in order is nothing.

Sound counter-intuitive? It is.

You’re not going to change your spending habits, you’re not going to change your income, you’re not going to change your monthly bills. You’re simply going to track your incomes and expenses for the next three months. Tracking this information lets you find out where your money is coming from and where it’s going.

Microsoft Money Plus - Financial IndependenceHow To Track Your Finances

There are a ton of different ways to track your money.

Some people like the old school method of pencil and paper. And that process works just fine. Write down dates and transactions – incomes and outcomes. At the end of the month, add them up.

Other people, myself included, prefer a slightly more technologically advanced approach. There are many software applications (both freeware and paid) that allow you to track your expenses. We have been using the freeware software Microsoft Money Plus. Yes, it’s Microsoft, but it does a great job of providing a clean interface that allow us to easily track my money. In addition, it allows us to run monthly reports. Plus it’s free – that’s a bonus for this endeavor! You can find it, along with a handful of other free finance tracking software suites, on this site.

Batten Down the Hatches

Now you need to take an honest look at the results of your financial tracking.I’m going to warn you right now – this next step isn’t going to be comfortable.

We spent three months tracking my financial transactions – every paycheck, Dunkin Donut stop and fill up at the gas station. After three months, we was able to generate three monthly reports and get a pretty good snapshot of how we spend our money.

At this point, we could see where we needed to tighten the belt a little. One of our big findings was that we were eating out – ALOT! Those $5 breakfasts, lunch runs and “we’re too tired to cook” dinners were catching up to us. We had a couple of other areas we were unknowingly spending a lot of money.

The next step is to tighten up in your overspending areas. This step will be uncomfortable. Not going out to eat as much as we used to sucked. For instance, I personally felt like I was losing a social aspect of work.  Likewise, we felt we worked hard during the week and deserved to go out to a nice dinner on the weekends. But you know what else we found out? We found out we were able to save some money in just a few months. After tightening the belt a bit for a few months, we were starting to see our income trump our expenses for the month (you’re still tracking your finances, right?).

We made a list of our debts – credit cards, loans, mortgages, etc. And we also stumbled upon Dave Ramsey’s Debt Snowball. Spend some time reading up about this approach on your own, but the premise is this:

Pay off the smallest debt first by adding additional monthly payments while still paying your regular monthly payments to all your bills. Then you take the money you were paying monthly on the first bill and tack it onto the payments for the next smallest bill. Once that loan is paid off, you take the money you were paying on the first two loans and attack the third smallest loan with that extra monthly money. And so on, and so on. Essentially you’re paying the same amount every month, but your debt starts to disappear.

Debt Snowball Spreadsheet from Vertex42.com - Financial Independence

Download the Debt Snowball spreadsheet from Vertex42.com

We’re in the middle of this process – approaching some of our bigger loans – and can honestly say it works. Dave Ramsey has a pretty good approach to financial security – give him a chance.

Financial Independence – Now What?

So you’ve paid off everything with exception of maybe your mortgage. What do you do now? First – give yourself a giant slap on the back. You’ve done something that most folks don’t think is possible. You’ve used what you have to get out of debt. You can breath easy. You can sleep sound at night. Next – make yourself a promise. Promise yourself that this will NEVER HAPPEN AGAIN! Make smart decisions, don’t finance your wants and live debt free. Now you can prep with an open mind.

You’re probably asking – do I need to take care of my finances before I do any prepping?

The answer is YES…and NO.

First, remember that building up your financial security is a big part of prepping, so don’t overlook it. Second, realize that you can do small things on a daily, weekly and monthly basis to build up your preps. We’ll get into different ideas when we talk about water and food storage. Also, if you can find ways to augment your income, you can justify making a ‘prepping fund’ where you can save money and put it towards prepping. This approach doesn’t strictly follow Dave Ramsay’s advice, but I have found that allowing yourself an occasional ‘reward’ does help you keep on the straight. At least for me, sometimes I need something more than seeing the monthly statements disintegrating before my eyes. Just be sure that your occasional treats don’t overtake your debt reduction process.


I hope you enjoyed this first article on Prepping 101. I am happy to answer any questions in the comments section here or on Facebook. If you don’t want to make your question public, you can always email me at dan AT suburbansteader.com. Keep an eye out for our next Prepping 101 article on identifying what you’re doing that’s working against self-sufficiency.

photo credit: psyberartist via photopin cc

Prepping 101: Financial Independence


Prepping 101: Overview

Up until about a year ago, I was walking around dumb and happy. Life was pretty good – I had a good job, a nice house and a wonderful family. I could afford to live quite comfortably.

Then Hurricane Sandy hit Long Island on October 29, 2012.

We’re Not Ready

I was one of the fortunate ones – our house was nowhere near the flood zones, we had minimal structural damage (just some siding that blew off), no major landscaping damage (no trees down on our property) but we were without power for eleven days.

While we were quite fortunate compared to most, this event opened my eyes. I have a young family – at the time, my twins were three years old. My wife and I had no lights, no heat and no hot water. In addition, our phone was not working and cell coverage was limited at best. We were on our own. We didn’t have any kind of energy back-up, so all the food in my refrigerator and freezer went bad within three days. Fuel shortages were common resulting in both a limited ability to drive to stores and limited ability for delivery trucks to bring supplies (including food) to Long Island. On top of all that, the police force was swamped with keeping the lines at gas stations in check and keeping dangerous areas (such as those with live wires down) safe.

We quickly realized we were on our own.

Why am I telling you all of this? The reason is simple – I quickly found that I wasn’t prepared to take care of my family. It wasn’t a zombie apocalypse or a complete government collapse that made me realize I needed to prep. It was a relatively simple weather situation that took away all the comfortable amenities that society provides. I realized that I had a lot to do in order to provide a comfortable alternative to my family in case something like this happened again.

The “Oh Crap! Moment

At this point, I did what I normally do – started consuming way too much information on stuff I didn’t know. I started reading about prepping and survivalism which, up to that point, was something I viewed as crazies were preparing for zombies and complete government collapse. As I consumed more, I ran into a few websites and forums that made sense of all this information. Jack at The Survival Podcast and the good folks over at the WhenSHTF.com forums made me realize that you don’t need to be absolutely nuts to think about having some things set aside for real world scenarios. But, as I read more I got wide-eyed.

Holy Crap! I’m way behind the curve on all this!

I started freaking out about all the stuff I needed to do – stored water, stored food, protection, power backup, financial security, gardening, etc. How do I do all this stuff? Where’s the money going to come from? How do I know what to start with? What if…What if..What if…

I was overwhelmed.

Then I Took A Breath

After I became all consumed with this information, I took a step back and took a deep breath. The world’s not ending. Life as we know it is not over. The sun is still rising in the east and setting in the west. Life is still OK.

At that point, I realized that I had a lot to do, but I needed a plan. To make this plan, I needed to identify all the different “buckets” that I needed to address. Once I had calmed down, I came up with the following “buckets” I needed to address:

  • What’s Not Working (against self-sufficiency)
  • Food
  • Water
  • Shelter
  • Power
  • Security/Safety
  • Health and Sanitation
  • Money

Prepping 101 – How To Get Going

Each one of these buckets has a lot of information and tasks associated with it. I’ll be the first to admit that I have not achieved a high level of success in all of them. I haven’t even addressed some of them yet.

That being said, over the next few weeks, I will be addressing each one of these buckets in the Prepping 101 series. These posts will describe how I have attacked, or plan to attack, each one of these buckets. I will include worksheets, where applicable, as I move through the different plans. The end result will be a plan on how to get a basic prepping plan in place so that you can feel comfortable that you and your family are taken care of if something like a Hurricane Sandy happens to you.


Side Note: While I evolved this approach to my prepping needs on my own, this series of posts has been heavily influenced by the two following podcasts by Jack at The Survival Podcast. His description of the “Oh, Crap!” moment was eerily in line with my thought process and prompted me to describe how I approached prepping. I highly recommend everyone check out the following podcast episodes for further information:

photo credit: bozer★ via photopin cc

Prepping 101: An Overview