1

May Preview – Project TWH

May is lining up to be an interesting month at the Suburban Steader Homestead. In the May Preview of Project TWH, we’ll talk about a lot of things that may seem unrelated. A few are pure homesteading activities and a few are more general approaches to the suburban homesteading lifestyle. It’s an interesting mix of tasks that I think you’ll really enjoy.

As usual, we’ll be referencing The Weekend Homesteader throughout this month. In fact, our four main articles for the month will be centered around the four topics Anna Hess outlines for May:

  • Plant Your Summer Garden
  • Nutrition
  • Mulch
  • Teamwork

Plant Your Summer Garden

  • Goal: Plant a small garden
  • Cost: $0-20
  • Time: 1-5hrs
  • Difficulty: Easy
  • Kid-Friendly: Yes

Finally! The planning in April is paying off and you’re ready to put seeds and seedlings into the ground! In this post, we’ll spend time talking about when to plant and what information to take into account when planning. We’ll also discuss resources available to you which can help you time your plantings appropriately. Succession planting will be a topic we touch on as will how to plant. Finally, we’ll spend a little time talking about maintaining the garden once you’ve got crop in the ground.

May Preview - Project TWH

photo credit: Arya Ziai via photopin cc

Nutrition

  • Goal: Discover what types of food make your body healthy and happy
  • Cost: $0-5
  • Time: 1-10hrs
  • Difficulty: Easy
  • Kid-Friendly: Maybe

You can’t run a suburban homestead if you’re not of sound body. That means that nutrition and physical fitness are important to us. With that fact in mind, we’ll take a look at what is good nutrition and how do we acquire it. I’ll spend a little time talking about how I honed in my nutrition a bit (spoiler: I’m not perfect, and you don’t have to be) and I’ll wrap up with a list of resources that I recommend you look into in order to make your own informed decisions.

Mulch

  • Goal: Mulch your garden for weed control and organic matter production
  • Cost: $0-100
  • Time: 2-10hr
  • Difficulty: Medium
  • Kid-Friendly: Yes

Sick of weeding? Mulch is your solution. But there’s more benefits than just reduced garden labor when it comes to mulch. I’ll talk about the pros and cons of mulching and whether I believe it to be a solid tactic for your garden. We’ll dig a little into the science of mulching but don’t worry, you don’t need a degree in chemistry or biology for this discussion. We’ll finish the discussion by identifying different kinds of mulch, potentials places to source them and how to apply them to your garden.

Teamwork

  • Goal: Find a person or group of people whose homesteading skills complement your own
  • Cost: $0
  • Time: A lot or a little
  • Difficulty: Medium to difficult
  • Kid-Friendly: Maybe

While we aim for a self-sufficient, self-reliant life, suburban homesteaders aren’t going to go it alone. Nor should they. Building community through teamwork is key to long-term survival. I’ll spend some time talking about different roles within a team and how they might jive in a community setting. In the end, I’ll wrap it up talking about how I’m using a community teamwork approach to build my suburban homestead.

Conclusion

So there you have it, the May Preview of Project TWH.  Sounds like it’s going to be a busy month with a lot more hands-on activities than April. I’m really looking forward to a lot of the topics coming up this month – I could spend hours talking about nutrition and teamwork as they both relate to big parts of my past. I’m also VERY excited to get my garden in the ground. I hope you sit back, enjoy a cup of coffee and join on our suburban homesteading journey in May.

Like what we’re doing here? How about letting us know in the comments or on Facebook?

photo credit: Distant Hill Gardens via photopin cc

May Preview - Project TWH


Plan Your Summer Garden

Over the last few weeks, I’ve talked about Finding Room to Homestead and how to perform a Suburban Homestead Site Survey. Now that you know how you’re going to approach your suburban homestead and where on your land you’ll be conducting different suburban homesteading activities, it’s time to plan your summer garden.

For most suburbanites, setting up a garden is the first step to a suburban homestead. Guidance from The Weekend Homesteader is quite useful in making sure that you avoid a few pitfalls and are aware of a couple of tricks and tips for this otherwise simple task. With that thought in mind, we’ll be covering the following topics in this post as well as talking about how we implement these areas of knowledge on the Suburban Steader Homestead:

  • Garden Size
  • Garden Location
  • Garden Layout
  • Simple Vegetables and Herbs

Garden Size

If you remember one thing from this post, remember this:

You don’t set and forget a garden

You will be working this area extensively throughout the season – weeding, harvesting, planting and maintaining. The reason I emphasize this point is because the biggest mistake you can make when you plan your summer garden is to bite off more than you can chew. Designing a space that is too large will be more detrimental to your suburban homesteading success.

Why is too big worse than too small you ask?

The answer lies in availability of time. You only have a certain amount of time that you can spend gardening. This fact is especially true with suburban homesteaders as they are not working the homestead all day, every day. Typically a garden is a weekend and/or after work activity for most of you.

So, how big of a garden should you build?

If you’ve never gardened before, I suggest you plan your summer garden in an area that is roughly four (4) feet by eight (8) feet. This approach will give you forty-eight (48) square feet of gardening space. Anything more than that is going to be too intimidating. You can have a few side items if you like outside of this area (potted tomatoes, blueberry bushes, etc.) but the majority of gardening should happen in this area.

Note that Anna Hess disagrees with me. She recommends beginners can go up to one hundred forty-four (144) square feet – three times what I recommend! All I can say to that is remember that it’s always easier (mentally and physically) to expand your garden than decrease its size.

Suburban Steader Homestead Garden Size

For the last half decade or so, I’ve used a roughly forty-eight square foot area for my garden. By using the space efficiently – I implement Square Foot Gardening principles – I have successfully offset my family’s vegetable consumption by a significant margin. Please do not take that to mean that we are anywhere near self-sufficient.

I’ve doubled our garden space this year with the addition of a four foot by eight foot raised bed. In addition, I have some perennials (blueberries, strawberries, etc.) on other locations which are above and beyond this ninety-six square feet of garden area we now have.

Garden Location

In my last post, I talked extensively about how to lay out your suburban homestead based upon a long list of factors. There’s not much more to be said here that hasn’t been outlined in that post. The one bit of advice I would give is to plan your summer garden so that it is not far from the house. The closer you are to your garden, the more apt you will be to work on it and the better success you will experience.

Suburban Steader Homestead Garden Location

As you’ve seen in this picture, the new garden box I put in is right next to our patio. The old garden box is about as far away from the patio as you can get on my land. This update is already paying dividends. I spend a few minutes each day tending to the closer garden box whereas I don’t walk out to the other one as much. This little bit of knowledge has taught me that I’m going to put the more needy crops in the closer box.

Garden Layout

I have two main tips when you plan your summer garden on your suburban homestead:

  1. Remember the Two Foot Rule
  2. Visual Record Keeping

The Two Foot Rule

This rule is something I learned from Mel Bartholomew in his Square Foot Gardening principles. Most people cannot reach into a bed more than two feet. If you design your garden so that you can reach every piece of soil with this rule in mind, you’ll never have to walk on your garden (compressing the soil) and you’ll be able to utilize all your land. That’s part of the reason I recommend four foot by eight foot beds. As long as the maximum dimension on one side is four feet, you’ll be able to reach the middle on either side.

Visual Record Keeping

I’ll be perfectly honest – I have a crappy memory.

I can’t remember what I planted or where I planted it, especially if I’m starting from seed. That is why I use a visual record keeping system. Not only does it remind me of what I planted where, but I can track when I planted it, how many plants/seeds I planted and plan accordingly.

I use a piece of software called Garden Planner from GrowVeg.com. While I’m a kind of tech geek, there’s nothing wrong with good old paper and pencil to keep track of your garden layout.Plan Your Summer Garden - Garden Planner Software

Simple Vegetables and Herbs

All this work to plan your summer garden and you don’t even know what you’ll be growing yet. Not any longe!.

It’s time to pick your produce!

As a novice gardener, Anna Hess and I agree that picking simple, easy to grow vegetables will give you early wins and build your confidence. With that thought in mind, we recommend the following items:

  • Swiss Chard – A summer green that is virtually work free. Cooks up like spinach but much easier to grow.
  • Summer Squash (inc. Zucchini) – Big and beefy, these veggies will provide you with lots of produce as well as lots of confidence. There’s something boastful about growing a plant as big as summer squash can get. With that in mind, summer squash does take up a lot of room, so if space is at a premium, you might want to think this one over.
  • Green Beans – Quick to sprout and quick to harvest, these guys will give you a quick, bountiful victory. Bush beans don’t need a trestle but will grow very quickly meaning you’ll be replanting a lot.
  • Tomatoes – They love sun! While they’re a bit more finicky than some of the other veggies mentioned, you can’t beat the taste of a homegrown tomato. Buy them in seedling sets and plant them deep. Too much water is a problem for these guys.
  • Mint – A quick grower and a perennial to boot! Mint will take over your garden if you’re not careful so make sure you have a root barrier in place or, better yet, start it in a pot.
  • Basil – Drop the seeds, water and walk away. You’ll have fragrant leaves all summer.

Anna also recommends okra – I can’t really comment on that as I’ve never grown it. I will say that the items I would add to the list are romaine lettuce and broccoli. Both grow rather easily from either seed or seedlings.

The most important thing to do when picking what you grow is remembering what you eat. It’s a shame to grow tomatoes if your family dislikes them. At best, you’ll have a harvest and not know what to do with it and, at worst, you won’t work your garden because the outcome doesn’t interest you.

Wrap-Up

There you have it – how to plan your summer garden in a few simple steps. Remember that, at the end of it all, gardening should be a relaxing endeavor, not something you feel is a chore. That’s not to say it’s not a lot of hard work, but if you find yourself resenting the garden, take a step back and figure out why. You should be enjoying this work – you get to reap all the rewards!

Please let us know any tips you have for planning your summer garden in the comments or on our Facebook Page.

Plan Your Summer Garden


Suburban Homestead Site Survey

In the last post, I talked about how to find room to set up your suburban homestead. Now that you’ve found a place to start your suburban homesteading activities, it’s time to perform a homestead site survey.

Performing a homestead site survey, especially on a suburban homestead, will enable you to figure out HOW you’re going to homestead. Where are you going to plant items? Where do you have constant sun? Constant shade? Is the soil better in one area than another? All these issues will be addressed in this post.

As always, we’ll use The Weekend Homesteader as a guide and we’ll correlate all our instructions back to how we’re implementing them on the Suburban Steader Homestead. The main topics we’ll be hitting on in this post are:

  • Mapping Your Land
  • Sunlight
  • Soil Quality
  • Nodes and Paths
  • Map of Your Community

Mapping Your Land

A map of your suburban homestead is critical to developing a plan of attack for your suburban homestead. Knowing where you are on the land and proximity of critical components to each other is crucial to proper planning. With that in mind, the first step in performing a suburban homestead site survey is to draw a map.

You’re probably thinking “But I’m horrible at drawing!” Don’t worry, we have a solution – in fact, we have two!

  1. Graph Paper Maps
  2. Google Earth Maps

Homestead Site SurveyGraph Paper Maps

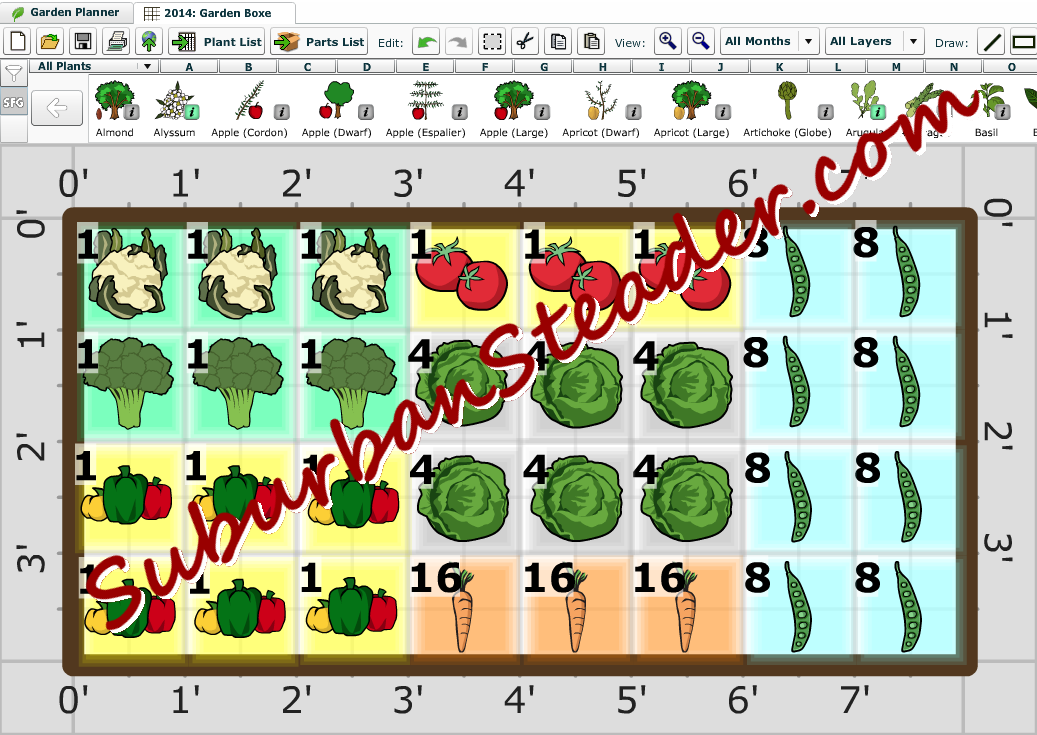
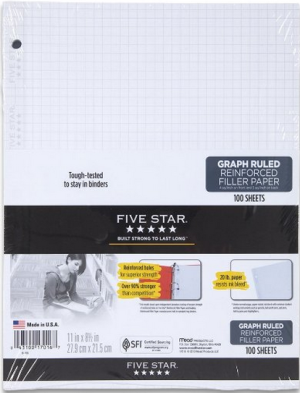
This solution is super simple. The first step is to get your hands on some graph paper like the kind shown to the left. Next, you have to figure out your scale.  I typically try and keep the scale rather small.  For instance, my maps are typically drawn where each box represents a 6in x 6in area of land.  This approach keeps the map’s resolution fairly legible (you don’t want your map too small). The size you choose is up to you at the end of the day.

Now you simply walk your land and measure distances.  Draw lines as you go to represent areas of interest. For the most part, these areas will be sketched by straight lines.

You can measure distance in a variety of ways.  I like things to be as accurate as possible since I’m an engineer by trade.  I use tape measures or survey measuring wheels like this one.  But you can also estimate the measurements by measuring your stride (most people have a roughly 3ft stride) and counting strides as you walk.

This approach is very basic to drawing a map.  It will  work quite easily for you.  The next method is also simple.

Google Earth Method

Not interested in drawing and measuring?  No problem.  Load up Google Earth on your computer and you’ll be all set.

All you have to do is search for your address and then cut and paste the view into the photo editing software of your choice (I use Paint.NET). A little bit of trimming and you’ve got a great aerial view map of your property.

Homestead Site Survey

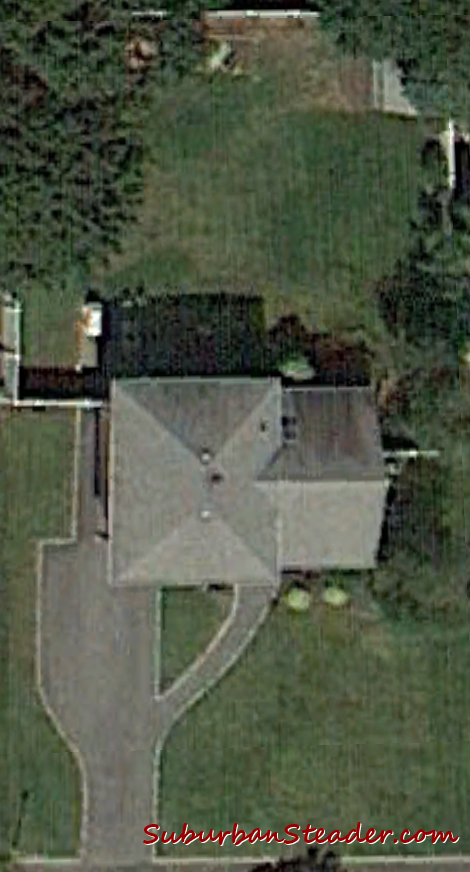
There is one problem with this solution.  The tree canopy may obscure the view of the land if the satellite imagery was taken during spring/summer.  Other than that one small problem, this approach allows you to quickly and accurately get a map of your suburban homestead.
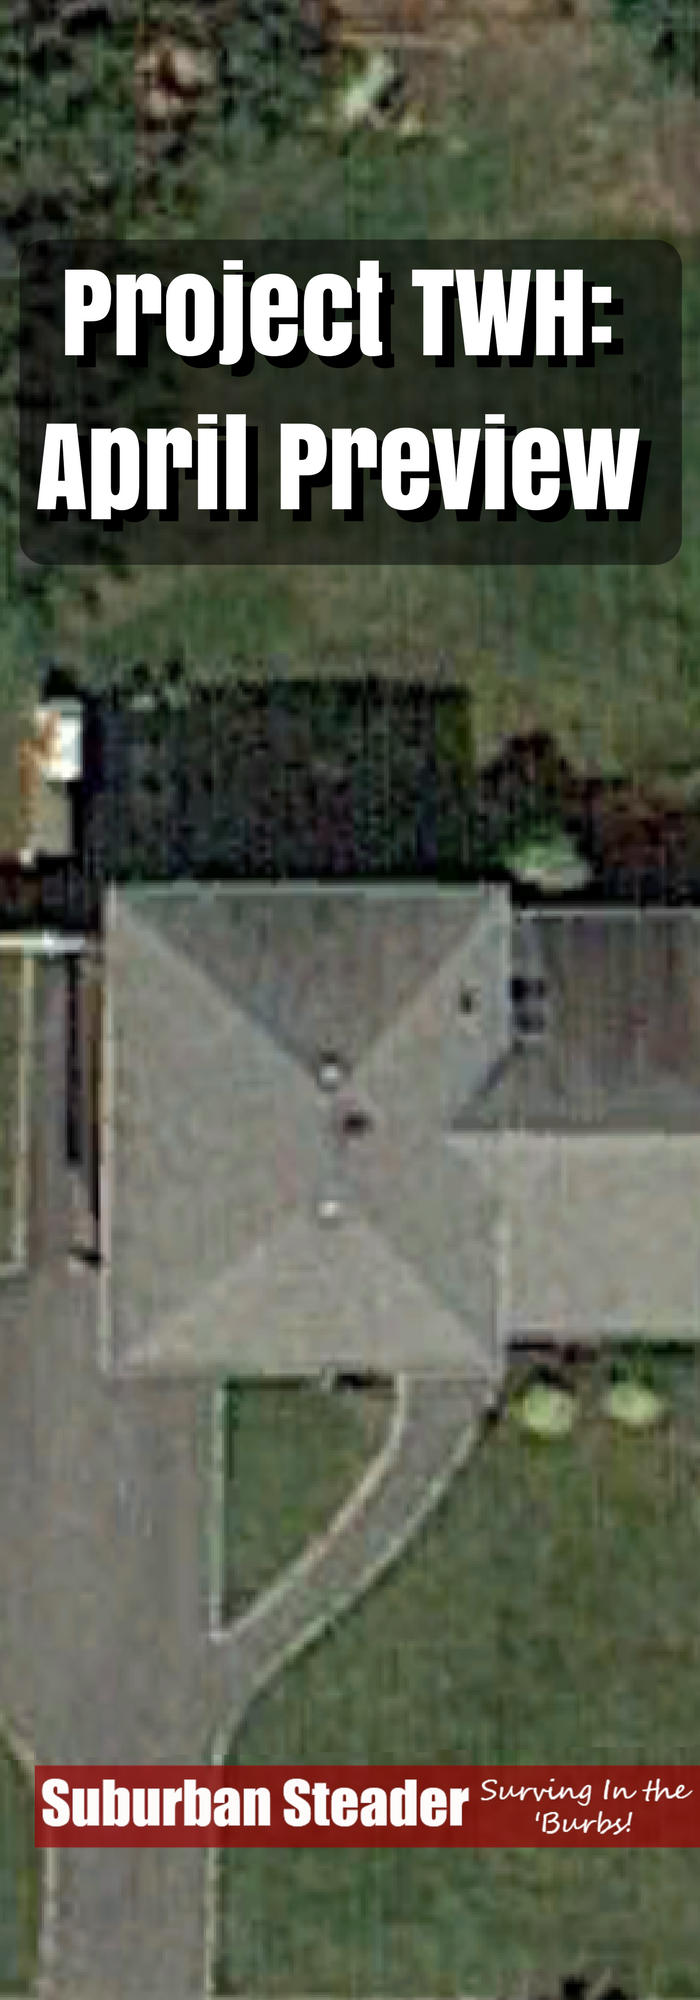
How We Map Our Land

I’m a fan of letting technology do the work for me, so I used the Google Earth approach as you can see above. You can see that the view is very simple, but concise. The picture above is also a good example of how the tree canopy can obscure the view of some areas. I’m OK with this view, however, because the northwest corner of my land will not be used for much suburban homesteading activity and that is where I have the biggest problem with tree canopy obscuring my view.

Sunlight

The second part of your suburban homestead site survey is determining sun and shade profiles. Sun and shade are important for different reasons. Your garden wants as much sun as possible year round. Your chicken coop, on the other hand, may want shade in the summer and sun in the winter.

You have a few options on figuring out the sun and shade scenarios on your property.

The first option is pretty simple. Remember that map you made above? Make a handful of copies and be prepared to sketch a little. Got outside at regular intervals (I would recommend morning, noon and night at the beginning of every month) and sketch the shade profile on your land. You’ll quickly see how the shade moves across your land during the day and also how time of year changes this profile.

The second option involves a bit more technology. You can use a combination of Google Earth and SketchUp to model your land and key shade producing structure. A sample of this approach is shown below.

Homestead Site Survey

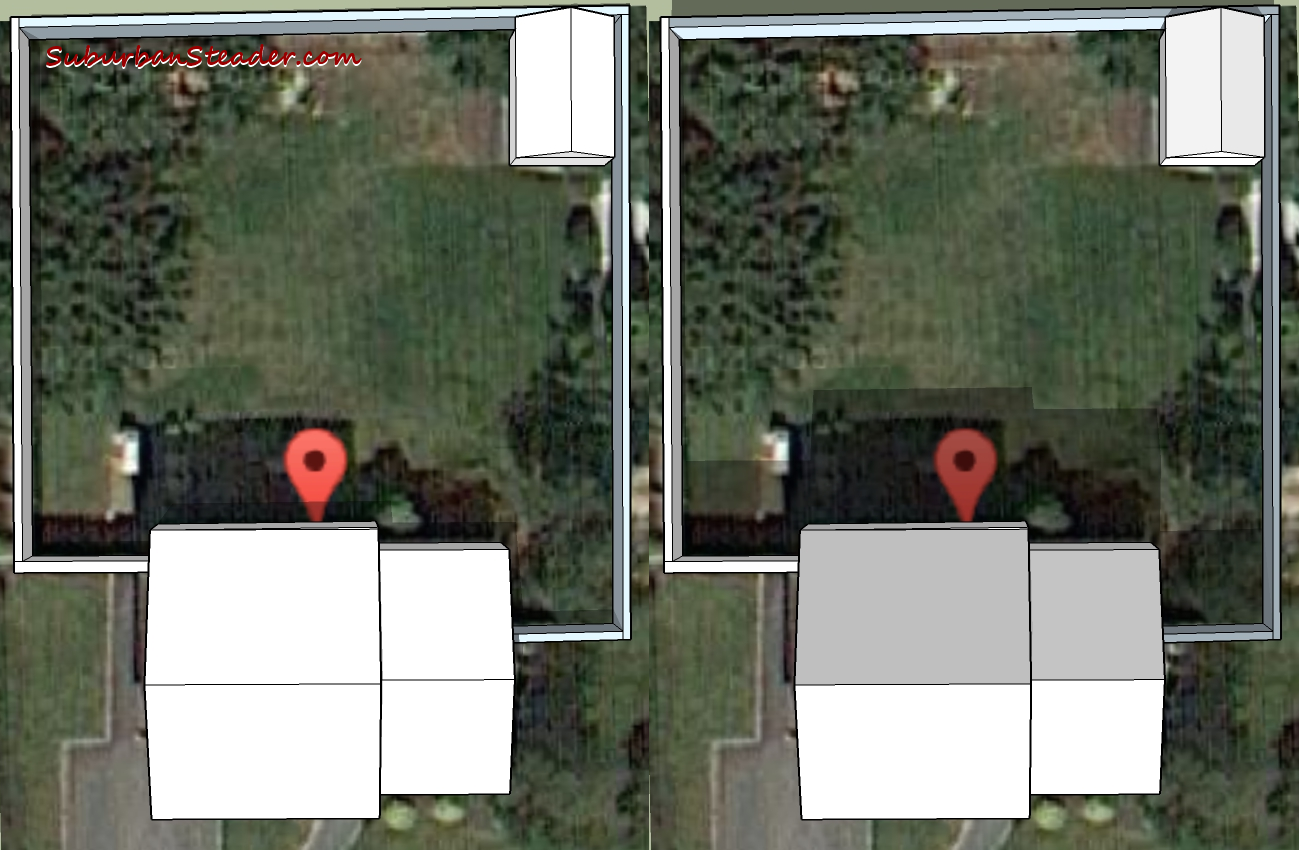
Left: Summer Solstice || Right: Winter Solstice

The geek in me enjoys this approach, but the process is beyond the scope of this post. Check out this article to see how I did it.

Sun and Shade On Our Land

The picture above gives you a good idea of what we are looking at on both the summer and winter solstice. You can see we have a big tree canopy as well that provides shade to the yard during the day. We’ve determine planting areas on the land based on shade profile. More on that later.

Soil Quality

Next to sun, soil is the most important factor in your suburban homestead site survey. This step is as simple or as intricate as you want to make it.

Here’s what I recommend – take it simple.

Walk your land and take note of what’s going on. Is the area lush with growth? Does it have hard compacted soil where nothing is growing? Is it soggy? Dry?

Now take a spade and dig up some soil in a few random spots. Ideally, you want to find areas with dark, moist (not saturated) soil which indicates fertile land. The presence of earth worms is a great find! Harder to dig areas may mean a presence of clay. Likewise, rocky and/or sandy areas may drain water too quickly.

Understanding your soil gives you an idea of what you may want to grow in certain areas. This information, combined with the shade profile exercise above, will help you determine what you’ll be planting where.

Our Soil Quality

The Suburban Steader Homestead has some unique areas (as do all pieces of land). As you probably know, we’re located on Long Island which is basically a B-I-G sandbar. That means we have some fairly sandy soil. Our house was built in the mid-1950’s and, as luck would have it, the original owners were gardeners. They manipulated the soil over the years in such a way that we have fairly fertile land.

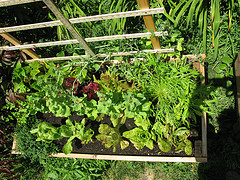
Our lawn is probably the sandiest of the spots, but it still grows grass quite well. The big upshot to the land is the sides of the landscape where flower, and now vegetable and fruit, beds reside. Years and years of wood mulch have created a very fertile soil in these areas which allows us to plant with relative ease.

Nodes and Paths

No suburban homestead site survey is complete without understanding the most and least travelled areas on the land. Humans, and our pets, tend to take the path of least resistance when travelling from point to point. This information is important because there is no sense in planting a garden bed right in the middle of the path from the back door to the shed.

To understand your nodes and path in your suburban homestead site survey, take a copy of the map and draw a circle (or node) in any areas that receives a lot of attention from members of your family (human and pet). Doors, sheds, garage, garden beds, etc are all key points of interest. Next, draw a line between these nodes. These lines represent the paths that are most likely taken on your property.

The results of this activity give you an idea of where you may want to put in mulched or stone pathways. You also will want to consider planting high maintenance items near the paths. Likewise, areas that you don’t want Rufus to run over daily – your garden bed for instance – should be kept away from the paths.
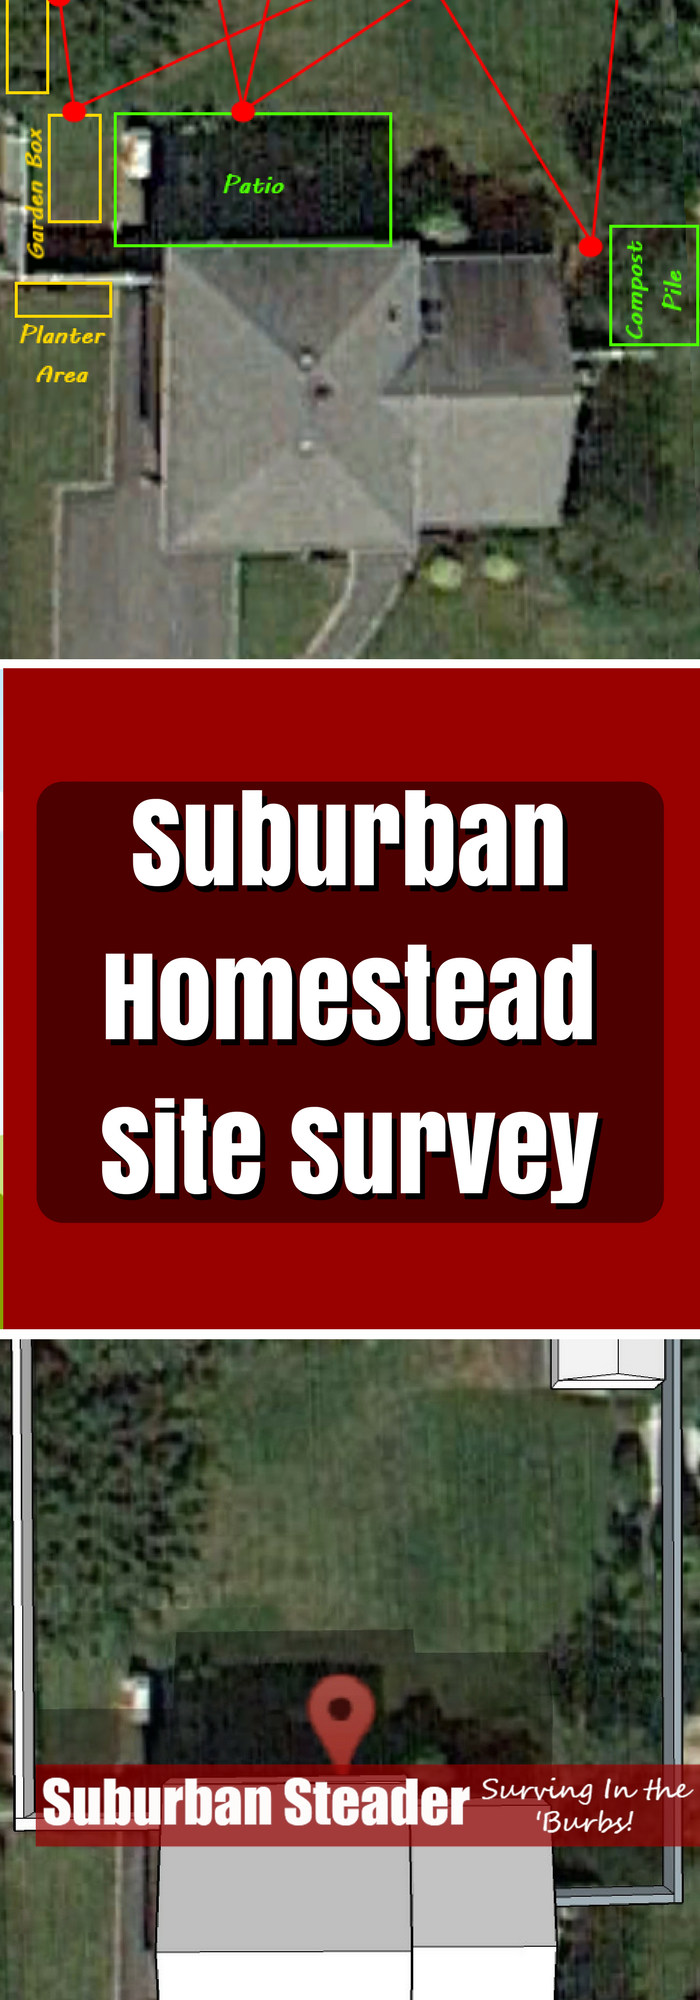
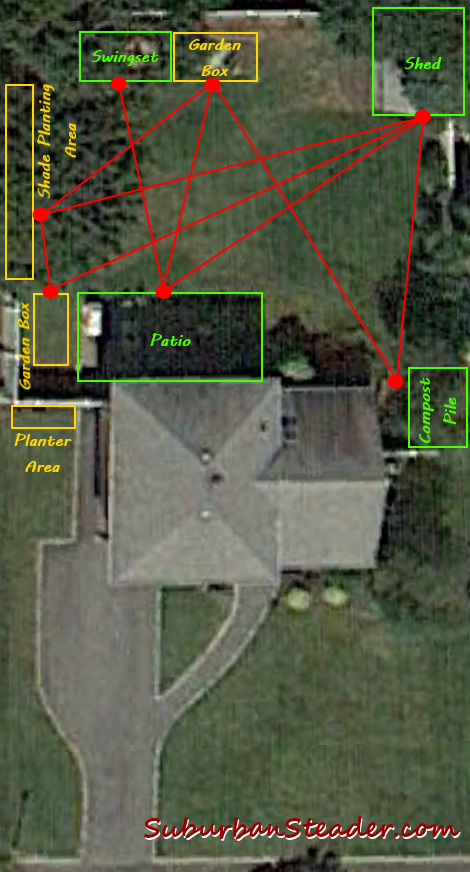
Our Paths and Nodes

You can see from the image below that we have a few main areas that we are constantly trekking to and from. The three planting areas, the shed and compost pile are all heavily trafficked areas. Fortunately, the lawn is right in the middle of all these things, so we don’t have to worry about important areas being trampled.

Homestead Site Survey

Map Your Community

This article is about doing a suburban homesteading site survey. Why would you want to map your community?

One word – RESOURCES

Going onto Google Maps and printing out a map showing the couple of miles around your land will be chock full of information. Some of the things you’ll find are:

  • Residential areas – great for finding bagged leaves to mulch your garden
  • Coffee Shops – those old grounds are terrific for compost
  • Stables – horse manure anyone?
  • Stores – might have out of date newspapers for worm bin bedding

All kinds of recon information can be acquired by this super quick, easy and inexpensive activity.

Our Community

Being that we are suburban homesteaders, we have a lot of ‘action’ local to us – many of which are referenced in the list above. I’ll be contacting many of these places in the near future to see if I can acquire homesteading materials for free or cheap.

Wrap-Up

That’s it – all you need to do to perform a suburban homestead site survey. It is not a trivial amount of work and yes, it is a LOT of maps. The good news is that, if you made it through all these steps, you should really be cranking with ideas on how to better set up your land to serve your suburban homesteading needs.

Please let us know any tips you have for performing a suburban homestead site survey in the comments or on our Facebook Page.

Homestead Site Survey


Finding Room To Homestead

Suburban homesteading is a different animal than normal homesteading. Finding room to homestead can be a tricky task for the typical suburban homesteader, especially those who live on small plots of land or in apartments. Granted, if you live in the suburbs but have a large plot, this task may be easy for you.

Those of you with minimal to no land need not fret – we’re here for you. This article will help you find room to homestead on your lot. We’ll use our lot as an example and concentrate on three main areas:

  • Lawns
  • Container Gardens
  • Areas Beyond Your Yard

Finding Room To Homestead

photo credit: gfpeck via photopin cc

Lawns

A lawn is one thing most suburban homesteader have at their disposal. Even if you live on a small lot, there’s a lot of room to homestead on that nice green carpet you have.

But how, you ask? That’s simple – landscape integration!

Even though it’s a lot of land from a homesteading standpoint, your lawn is something many suburban homesteaders don’t want to completely get rid of. Plus, what would the neighbors think?

First, forget about the neighbors. They don’t pay your rent or mortgage, so what they think doesn’t matter (unless you are unfortunate enough to live in an HOA). If you’re really concerned about your neighbors, you can keep your front yard untouched and hide your homesteading in the backyard.

Second, realize that you can incorporate homesteading into your lawn in a way that is aesthetically attractive while still functional.

Here’s a few examples of how you can incorporate homesteading into your lawn:

  • Incorporate bushes (blueberry, strawberry, etc) into areas where you’d normal put box hedge or other partioning bushes
  • Place fruit trees in areas you want to create shade
  • Build garden boxes and raised beds into your landscape rather than large inground gardens
  • Stick with hens if you are going to have chickens (and build an attractive tractor for them)

How We Use Our Lawn

We follow most of the suggestions above at the Suburban Steader homestead.

First, we do not have an in-ground garden. All of our gardening area is built into the landscape as raised beds. They allow us to landscape around the garden and provide a more aesthetically appealing element to the backyard.

Second, our backyard is fenced off and we have mulch beds around the majority of the fencing. We have been planting many perennial plants like strawberries and blueberries in these areas. This approach stacks functions as it puts an aesthetically pleasing plant in the mulched area and also provides an additional  food producers. If I’m going to maintain a plant, I’d prefer that it produces food for me.

We have primarily worked in the backyard.  The front yard is currently untouched but we do have plans for it. As we clean up the remnants of the former owner, we do plan on putting in some fruit trees – probably apple – in the future as well as some more “fedge” (food hedge) type plants on the peripherals.

Find Room To Homestead

photo credit: Bad Alley via photopin cc

Container Gardens

You’re not out of luck if you don’t have a lawn. You can still find room to homestead with container gardens. A sunny balcony, stoop or window can provide more room than you think for growing food. You’ll obviously be limited to what you can grown, but if you center on herbs and easier to grow plants like tomatoes and peppers, you’ll do just fine.

The one thing you need to pay attention to with container gardening is light. South facing areas will get more sun than others, but you can work with just about any light source. Do a little research on what grows best with the amount of sun you’ll get.

Soil will also be a concern. You don’t have the advantage or having seemingly limitless nutrients from the ground so you need to be sure to use a good soil full of organic matter at the onset and then supplement it with something like compost tea (we’ll talk about that later on in this series) on a regular – probably monthly – basis.

How We Use Container Gardening

Our use of container gardening goes back to the aesthetic approach. For the most part, the Suburban Steader homestead uses container gardening for easy access items like herbs. We place containers on the wall of our patio during the summer and grow items such as oregano, basil, parsley, rosemary and mint in them. These items are easily accessible when we are cooking (especially when cooking outside) and provide a fragrant aroma to our patio area.

Areas Beyond Your Yard

Taken up all the space your little window and stoop offer and want to do more? Here’s a few places you might be able to find room to homestead away from your home:

  • Community gardens
  • Empty lots
  • Neighbor’s lots
  • Churches or schools

Definitely talk to the folks who own the land before you go ahead and start homesteading on land that isn’t yours.

I want to make a point that, while we have talked almost exclusively about gardening, homesteading isn’t all gardening. You can do a lot of other suburban homesteading tasks like canning, cooking and food storage if you don’t have a piece of land to garden on.

How We Expand Our Homesteading

The Suburban Steader homestead is currently confined to our lot. We haven’t expanded much beyond our quarter acre other than to build community.

Wrap-Up

So there you have it – how to find room to homestead. Most of these steps are pretty easy. Take a look at your own little spot in life and see how you can tweak it to your needs.

Please let us know any tips you have for finding room to homestead in the comments or on our Facebook Page.

photo credit: Al_HikesAZ via photopin cc

Finding Room To Homestead


April Preview – Project TWH

In the April Preview of Project TWH, we’ll review the tasks we have lined up for this month.  A lot of these tasks are planning-related.  This April Preview couldn’t come at a better time for us.  The weather is finally warming up here on Long Island which means  it’s time to start planning our suburban homestead activities for the upcoming growing season.

In The Weekend Homesteader, Anna Hess outlines four tasks that we’ll tackle in April:

  • Find Room To Homestead
  • Survey Your Site
  • Plan Your Summer Garden
  • Kill Mulch

Find Room To Homestead

  • Goal: Seek out growing space even if you don’t own land
  • Cost: $0
  • Time: 1-2hrs
  • Difficulty: Medium
  • Kid-Friendly: Maybe

This task is rather simple despite the semi-ambiguous title.  We’ll spend a little time figuring out what we have in terms of our land.  During this time, we’ll take a look at what we can change/use/not use to grow and improve our suburban homestead.  We’ll look at the kind of land we have – lawn, forest, unused areas, etc – as well as areas where we might want to consider non-conventional approaches to suburban homesteading.  In addition, we’ll consider the use of areas beyond our yard (empty lots, churches, neighbors’ yards, schools, etc.) for expansion of our suburban homesteading use.

April Preview - Project TWHSurvey Your Site

  • Goal: Figure out the assets and problems presented by your yard and community
  • Cost: $0-5
  • Time: 2-5hrs
  • Difficulty: Medium
  • Kid-Friendly: Maybe

Now that we’ve identified WHERE we are going to homestead, it’s time to figure out HOW we’re going to homestead.  We’ll start by sketching a map of our land – don’t worry, you can print out images from Google Earth if you failed art – and determine what we really have to workout.  The map can be used to develop a sun and shade profile (possible in conjunction with Google Earth and SketchUp Make).  It will also be used to determine paths commonly used on the property.  Similarly, we will identify areas that are accessed the most and areas accessed the least.  The soil in each area will be analyzed for its ability to grow crop.  The culmination of this information will allow us to create a plan for our land and determine what activities will take place where.

Plan Your Summer Garden

  • Goal: Decide on the size, location and layout of your summer garden and choose the vegetables to plant
  • Cost: $0-20
  • Time: 1hr
  • Difficulty: Easy
  • Kid-Friendly: Maybe

Again, this task is fairly simple – we’ll take a look at the site survey and determining what we’ll plant where.  Each location and layout within each location will be reviewed.  In addition, a small discussion on record keeping and  it’s importance for a suburban homestead will take place.  The end result will be a list of vegetables we intend on growing.  We’ll also develop a general plan for where on the property each vegetable will be grown.

Kill Mulch

  • Goal: Prepare a garden plot without tilling the soil
  • Cost: $0-100
  • Time: 1-4hrs
  • Difficulty: Medium
  • Kid-Friendly: Maybe

Finally a task that involves real work and not just paper and pencil planning!  Kill mulch is “an easy way to turn last year’s vegetable plot…into a no-till garden” according to The Weekend Homesteader.  In the simplest description, we’re going to chop the current growth as close to the ground as we can, lay down some mulch or compost that has seeds in it, followed by wet cardboard or newspaper.  The kill mulch will be finished with weed-free compost and a thick layer of mulch.  This approach will ensure our garden area does not have any growth that we don’t want and will also build up the health of the soil.

Conclusion

So there you have it, the April Preview of Project TWH.  There’s not many of exciting things in this month’s task list but a lot of important steps to set up for a successful suburban homestead.  As the information and plan evolves, so will the homestead.  Now that we’ve laid out the plan for the month, we’ll keep you updated as we start to execute on each of these tasks.  Looks like the beginning of a fun journey!

Like what we’re doing here? How about letting us know in the comments or on Facebook?

photo credit: roman.petruniak via photopin cc

Project TWH: April Preview